Showing posts sorted by date for query Champions of Krynn. Sort by relevance Show all posts

Monday, March 3, 2025

Unlimited Adventures: More Adventures, Summary, and Rating


Unlimited Adventures
And specifically, "The Heirs to Skull Crag" adventure
United States
MicroMagic, Inc. (developer); Strategic Simulations, Inc. (publisher)
Released 1993 for DOS and Macintosh
Date Started: 31 January 2024
Date Ended: 25 February 2025
Total Hours: 29 (two full adventures, several partial ones)
Difficulty: Moderate (3.0/5), but depends heavily on the adventure
Final Rating: 50
Ranking at time of posting: 516/554 (93%)  
      
Summary:
    
Unlimited Adventures is a creation kit that uses the Gold Box engine, the basis of ten Dungeons & Dragons games and two Buck Rogers games between 1988 and 1992. "The Heirs to Skull Crag" is a short but satisfying adventure that exemplifies the strengths and weaknesses of the creation kit. It casts the party as a group of caravan guards who get caught up in the fate of a fortress whose lord or lady, called the Roadwarden, serves as the protector of trade routes through the Dragonjaw mountains. A cabal of odd enemies has slain the Roadwarden, and her artifact weapons and armor have been scattered among the factions. The party must recover the items while arbitrating a succession feud among the dead Roadwarden's children. There are several side areas and adventures.
   
The module makes excellent use of the variety of enemies allowed by the engine (which is based on the latest commercial version, as seen in 1992's The Dark Queen of Krynn), the tactical combat, the spells, character development, and equipment. Weaknesses are the same as the weaknesses of the Gold Box engine and the Unlimited Adventures kit in general: no interactivity to the environment, a broken economy, and graphics that are all stock art rather than created specifically for this story. It nonetheless stands up well against other Gold Box games.
     
*****
     
The next adventure I checked out was "Ghost of Greyhawk Manor," by Mike Whyte, apparently created as part of a 1993 Halloween contest on America Online. The plot is that the PC (whichever party member was selected when you hit "Begin Game") is on the trail of a malevolent entity named Malhavok. Years ago, Malhavok tortured and slaughtered the PC's family and burned his village. The PC has traced Malhavok, through similarly destroyed cities and scenes of slaughter, to the town of Greyhawk.
    
Right now. This is the first time I'm hearing that name.
    
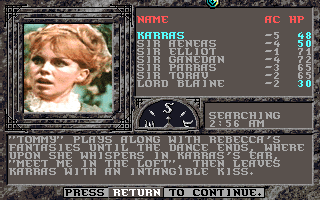
I decided to do something different and make the main character a cleric surrounded by five paladins. The game starts everyone at a relatively-high Level 9, to include cleric spells through Level 5 and +2 equipment. I envisioned the cleric, Karras, not as a kind, healing cleric, but rather a wrathful, vengeful one. I decided to see how long I could stay alive while giving all offensive spells to the cleric and relying on the paladins' "Lay on Hands" abilities for healing.
   
As the party enters Greyhawk, they witness an altercation between a local lord, Blaine, and a messenger from the duke, who is upset about Blaine's dalliance with the duke's daughter. In the inn, the party hears about the history of Lord Blaine's family. Fifty years ago, the viscount's daughter went insane and murdered her family, then killed herself. Her spirit still haunts the old manor, protecting a hidden vault of riches that succeeding generations have occasionally tried to find, most of them getting slaughtered by the vengeful spirit. Blaine himself barely made it out alive when he went for the treasure.
        
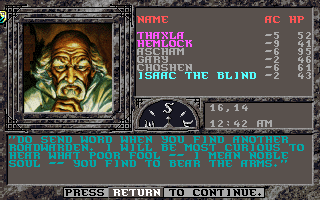
The party gets the main quest from "Duke Skynyrd."
    
The relationship between this haunting and Malhavok is unclear, but when the party meets the duke (amusingly named Skynyrd), he tells them that Malhavok is at the old estate, looking for the one weapon that can kill him: the sword Blackrazor. Lord Blaine (a Level 7 chaotic good human fighter) and one of his companions, Usurp Toe (a Level 10 lawful evil human fighter) join the party on the way out of town. We're soon attacked by a pack of wolves (I immediately start regretting my lack of "Fireball"), which causes Usurp Toe to run off after our victory.
   
The core of the game takes place in the enormous Greyhawk Manor. The author did a great job making the manor seem like a real place with evocative descriptions of rooms and encounters.
 
As you know, I'm a big fan of "flavor text."
       
He also took the time to create original art for the game, or at least digitize it from photographs.
     
They both look familiar, but I can't quite place them. Are they from Doctor Who?
       
However, it soon became clear that this is not a module in which you want to screw around with unconventional party composition. First, the module calls upon the skills of thieves and magicians; there are locks that need to be picked and doors that need to be "Knocked." Second, enemies are hard. The largely-undead bestiary resists most of the cleric's offensive spells (most of which are fairly useless even against normal enemies; does anyone really ever cast "Cause Blindness" in a Gold Box game?) and attempts to turn them. Many of them drain levels. And you can't easily ride back to town for a quick "Restoration" because the game likes to throw enormous wolf packs at you when you do.
      
We just wanted to get a drink and identify some equipment.
        
Thus, my mind turned to bringing my victorious "Restoration of Gundahab" party into the module. First, I needed something to get them from Level 6 to roughly Level 9. I sorted the list randomly and looked for the first 1993 module with a starting level of between 4 and 8. The first one was "Travelers and Thieves" from May 1993 by a "Turbo007." It creates characters with 40,000 experience points, which was about the average for my party.
   
The adventure does not have a description in the Rose Dragon database, nor does it have a title screen. The opening screen begins: "After your graduation, a group of your friends decides to take a trip to England to sight-see." The visit includes a tour of the ruins of "old town Cambder . . . the birthplace of the youngest king ever to rule England." (The youngest king ever to rule England was Henry VI, born at Windsor Castle in Berkshire. Things are not starting well.) The game uses the "tour" feature to escort us through the ruins, as the tour guide explains that a current archaeological project is underway at the location to "discover the secrets of time travel." The guide leaves the party alone to explore. The air becomes thick. Someone screams for help in the distance. Then . . . nothing. I walked on every square, tested every wall, tried sleeping, etc. Nothing seems to move the story forward. If I go back to the starting square, it just repeats the tour. I looked up a review of the adventure in the Unlimited Adventures newsletter from 2010, and it mentioned the problem but says that the reviewer "got around it." It does not say how. Meanwhile, however, it sounds like the module isn't great: "Nothing made sense."
     
The automap doesn't even show an exit.
      
I went back to the drawing board and selected the next game to match my criteria: "Volcano" from May 1993 by a "Dave C." Unfortunately, the database was wrong: Instead of the Level 5-6 adventure it promised, the adventure starts new characters at 140,000 experience points, or about Level 13 for a fighter.
   
Next up: "Shadow of Moloch" from July 1993 by "Skarsol." It begins on an outdoor map of a pleasant countryside called Lanethorn. We enter a peaceful village where the friendly people smile at us. It's all very suspicious.
    
The game begins on an outdoor map.
        
"Something nags at you," the game says as we leave the town. Before long, we're stopped by a group of armed men who demand to know our business. The leader pretends there's some trouble on the road ahead and suggests we spend the night in his camp. When we refuse, he attacks. The ensuing battle against a bunch of "Bestea knights" and "cult knights" leaves three of us unconscious.
     
I've played enough RPGs to know this won't end well.
      
More guards appear in a mountain pass, where we bluff our way through, then barely survive attacks by ice wolves and cult assassins. On the other side of the mountains is a menu town where the shop sells +2 equipment. 
  
I continue on to a castle on a promontory. A dark, severe-looking man greets me and says that all the priests are "engaged in a prayer convocation" hoping to "bring peace to this troubled land." We can't do anything here. Instead, we enter the village at the base of the castle. It is a full 16 x 8 map with an inn, a shop, a training hall, a tavern, and a temple. But something is clearly wrong. The residents are all fighting with each other. The schoolhouse is empty of children. We're attacked repeatedly by assassins in the street. And when we ask one resident about entering the castle, he returns with a squad of soldiers and tries to kill us.
     
The game has the first use of dialogue options that I've seen with the kit.
       
The problem: there's no way to exit the village. The entry square has no exit, and I've tried every other square and wall. I made some good experience fighting the assassins, and most of my characters leveled up twice, but if I'm going to continue with this module, I'll have to export the characters and start over. It's too bad, because I found this one promising.
      
A typical battle against cult assassins.
     
Thus, a bunch of false starts. I bear neither the kit nor the creators any ill will. They were amateurs attempting a new tool in its first few months of existence. What I'll do when I play the next one is choose one with the best ratings or something. But for now, I'm going to wrap up my current coverage of Unlimited Adventures and give it a rest for at least a few weeks while I make progress on some other games.
     
There is no good way to rate a kit. My usual practice to date has been to rate each game independently if the kit results in a standalone program and to rate them collectively (or based on the demo program) if the player must have the original kit to run the adventure. Obviously, a kit is only as good as the adventures made for it. Since Unlimited Adventures theoretically can accomplish the best of everything previously accomplished with the Gold Box games, a theoretical GIMLET score for it would add up the top score for each category across the series of Gold Box titles. That would be a 68, incidentally, but the highest I ever rated for "economy" was 4, and I think it's possible to create a game with a better one, so let's call it a 70. That means that I think Unlimited Adventures is probably capable of creating a game that rates higher, if only by one point, than any other game I've ever rated. It would tell a story and have encounter and side quest options as interesting as Pool of Radiance or Curse of the Azure Bonds, offer the depth of character classes and character-based role-playing as Champions of Krynn, keep the magic and combat system of any of the titles, and outdo all of them for the economy. Not much could be done about graphics, sound, or interface, which would keep even a perfect Gold Box game from pushing much higher than 70.
    
This is all most Gold Box games needed to immediately gain 3 GIMLET points.
        
But I don't think it's fair to the other games on my list to rate a kit by its hypothetical best product, so I'll give it a rating instead based on "The Heirs to Skull Crag," if for no other purpose than to keep the game from showing up in my list with a row of blank cells:
      
  • 5 points for the game world. I like the small, localized nature of the story. It has a fair amount of lore, but I think the developers could have done a better job setting up the reveal of the final villains. 
  • 6 points for character creation and development. It has all the strengths and weaknesses of the Gold Box engine and the first-edition AD&D system. We're so used to games that offer multiple races, classes, alignments, and meaningful leveling that we sometimes forget what a rarity it was in the early 1990s. 
  • 5 points for NPC Interaction. As with most Gold Box games, this is a weird combination of the people you can actually speak to (who are more "encounters" than "NPCs") and those that join the party. The dialogues, alas, offer little opportunity for choice or role-playing.
  • 6 points for encounters and foes. In terms of description, varieties, and tactics, any game based on D&D was doing monsters better than just about any other game during this period—and most of the exceptions were cribbing from D&D. Between different sorts of physical attacks, spells, effects like poison and paralysis, breaths, and resistances, the player is always having to adjust the strategy. While there are a lot of contextual encounters in the game—both combat and non-combat—there aren't many choices, and very little role-playing. 
     
The Gold Box series doesn't get enough credit for doing this in every module.
       
  • 7 points for magic and combat. I still think the Gold Box engine is one of the best ever designed for tactical combat. This module highlights its strengths superbly, and in general the authors deserve a lot of credit for programming so many spell effects. Most of the weaknesses are weaknesses of the system.
  • 5 points for equipment. You have a lot of equipment slots, plus usable items like potions. I always appreciate how easy it is in a D&D game (Baldur's Gate 3 a notable exception) to compare items. I wouldn't mind some item descriptions and greater randomization, and of course we're a long way off from crafting.
  • 2 points for the economy. It exists. You need money for training and item identification, and there are some magic items to buy. Like with most Gold Box games, which try too hard to stick to D&D rules about wealth and experience, the game is overly generous. The kit is capable of better, though.
  • 4 points for quests. There's a main quest and some side quests and side areas, but few opportunities for choices or role-playing.
  • 5 points for graphics, sound, and interface. We've talked about how, in a weird way, most of the graphics in Gold Box games are symbolic rather than literal, but I still can't bring myself to give it nothing at all. Sound effects, particularly combat sound effects, are sparse but decent. Where the engine really shines is in its controls, which simultaneously allow for intuitive mouse, keyboard, and joystick inputs.
  • 5 points for gameplay. The challenge level is perfect. The length is good, but a little short for everything possible with the engine and characters. There's inherent replayability in any system with so many character choices, but I don't think the plot is replayable. It's fairly linear but does give the player a few choices.
   
That gives us a final score of 50, which puts it right around the quality of the Savage Frontier titles. I agree with this. I think "The Restoration of Gundahab" would rank about the same, the better economy balanced by a slightly more linear and shorter plot.
    
In a November 1993 Computer Gaming World review, Rudy Craft didn't think much of the Gold Box ("sorely lacking"; "far removed . . . from the cutting edge of computer gaming technology"), but he still thought that the program was "the best adventure construction kit available." He points out that, "Origin has not yet released an Ultima Underworld adventure construction kit, nor are they likely to." Apparently, the original release of Unlimited Adventures shipped with bugs and without some crucial documentation, but both problems had been fixed at the time of the review.
 
(As an aside, Craft's description of the game begins with this sentence: "Unlimited Adventures allows the player to design and/or plan an essentially unlimited number of adventures." I have no previous experience with Mr. Craft, but I have to wonder if he's one of the writers who would later insist that "a role-playing game is a game in which you play a role.")
   
The kit sold just over 32,000 copies in its initial run, respectable for a product that was essentially just a repackaging of tools that already existed. I don't imagine expectations were very high; judging by contemporary accounts, SSI was pinning most of its RPG hopes on the subsequent release of Dark Sun: Shattered Lands. I'm not sure why, but the release of the kit marked the end of MicroMagic and was the last commercial release for most of its staff, including founder and lead designer Jason T. Linhart (I attempted to get in touch with Linhart to no avail).
     
My module list grows.
       
The kit accomplished its mission and lived up to its name. A creator/user community popped up immediately and continues to this day. As recent comments pointed out, Unlimited Adventures came out just before the widespread availability of the Internet. Accordingly, the manual simply envisioned players trading modules on floppy disks. But early adopters of the new paradigm took to cyberspace, where they organized an AOL Forum (1993-2001) and shared information on various Usenet groups. Developers and fans uploaded files to university web sites and FTP servers. A Yahoo group ran from 1999 to the late 2010s (Yahoo shut down all groups in 2019). The first web sites were online by 2000, cataloguing the best adventures in perpetuity.
       
The site I've been using lists 648 modules for the PC and 148 for the Macintosh, including around a dozen created in the last two years. Creators soon figured out how to "hack" the kit so that they could include character classes, races, environments, enemies, and equipment in worlds well beyond the Forgotten Realms, including most of the D&D campaign settings, Doom, Star Trek, Star Wars, Middle Earth, Arthurian Britain, and many others.
    
I look forward to sampling some of these as I continue my adventure through time. I obviously can't let myself get too distracted, but I can see inserting an Unlimited Adventure into the occasional streak of 30-point games just so I'll have something to look forward to. I'm taking the kit off my current list, but in no way are we done with it.

Wednesday, February 19, 2025

The Heirs to Skull Crag: Won!

1) As usual, a CRPG ignores the motivations of evil-aligned characters; 2) a good illustration of a bad use of the passive voice. The game should say: "There is great celebration and merriment as the party realizes that they saved Skull Crag."
          
This entry is going to elide a bit, as I lost the previous, lengthy, version of this entry that I wrote as I played. I'll have to reconstruct this replacement from screenshots and memory. I lost it the same way I've lost previous posts, by accidentally having the entry open in two browser windows at once. It's been several years since it last happened, though.
   
In broad strokes, the game involved the following steps:
   
1. Explore the town around Skull Crag and trigger the encounter in which the party saves Sir Dutiocs from his attackers. This results in the reveal that Roadwarden Arelin Starbrow has been killed, and that her sword, lance, and shield have been stolen by the attackers.
 
2. Agree to work with Arelin's daughter, the cleric Kallithrea, to recover the shield. Recover it from the ogre caverns southeast of Skull Crag.
 
3. Agree to work with Arelin's other daughter, the paladin Yemandra, to recover the lance. Recover it from giants to the northwest of Skull Crag (but southwest of the battlefield where it was lost).
    
Check that one off the list.
     
4. Agree to work with Arelin's son, the thief Dazmilar, to recover the sword. Recover it from minotaurs to the north of Skull Crag.
 
5. Resolve the kidnapping of Morudel, Arelin's widowed husband and father of the three claimants. This actually occurs after the first two quests above and before the third.
      
An unexpected development.
     
6. Use keys found at the sites of all the previous recoveries to enter some secret caverns that connect all the enemy headquarters as well as Skull Crag. Pursue the mastermind of the plot back to Skull Crag and win the final showdown in the Great Hall.
 
7. Decide whether to accept the final reward.
    
Steps 2-4 can be done in any order (with Step 5 occurring after the first two), but the relevant dungeons do not appear until you've accepted the quests. For each of these quests, you get a temporary NPC who leaves when the quest is finished. There are a number of optional areas and side quests, but not nearly as many as the game makes it seem; there's no way to get to the east side of the mountains and explore all the locations that appear there on the outdoor map.
     
Only the western third of this map is explorable.
     
I did steps 1-2 in the first two entries and then did all the rest for this one. Once you get into a groove, the Gold Box games go fast. I was also a bit inconsistent with my mapping, as most of the game's maps are small and you're never going to visit them again.
     
One of several side quests.
      
About two-thirds of the way through, I began to regret my party choices. I had slapped this party together using random rolls of the dice, expecting that the module would be short and somewhat trivial. I didn't count on its length or depth. By the end, I was rueing my selection of races with level caps. It's going to be all-human, all the time in future Unlimited Adventures games.
   
The economy got worse and worse. I replaced all my regular arrows with hundreds of +1 arrows from the elven village and loaded up my mages with spell scrolls. I bought several 8,000-gold-piece Scrolls of Protection from Dragon Breath, even though I never actually used one in the few dragon battles we faced. Despite these purchases, I ended the game with tens of thousands of platinum pieces in the vault, tens of thousands more left on the battlefield, and I never identified a single gem or piece of jewelry.
    
Looking for ways to spend my money.
      
Equipment rewards were generous. The specific rewards I got for which quests is something I lost with the corrupted entry, but by the end of the game, I had a Girdle of Giant Strength, a couple suits of elfin chain +3, a couple of long swords +3, a long sword vs. giants, Gauntlets of Ogre Power, Boots of Speed, a silver shield +3, a two-handed sword +3, two suits of plate mail +3, a helm +3, a mace +3, two Cloaks of Displacement, a Ring of Blinking, two Rings of Invisibility,  and a fine long bow. I still want to go back in time and observe the original decision among the Pool of Radiance team that made a "fine long bow" better than any explicitly magical longbow you could find.
     
We recovered the lance from a gloomy cave northwest of Skull Crag. The small map was full of encounters with large parties of hill giants, plus one battle with purple worms. One thing that I admire about the module is that all the fixed encounters are what I call "contextual encounters." You don't just stumble upon an enemy party; you get a paragraph of text that describes what the enemies were doing and the circumstances in which you encountered them. These paragraphs make the game feel more like a module. Examples:
       
           
The hill giants turned out to be working at the behest of a blue dragon, who attacked me by itself. I dislike blue dragons because no regular spell protects against their lightning breath. I was able to kill it before it killed any of my characters, however. If I had died, I would have reloaded and used one of those Scrolls of Protection from Dragon's Breath. I really wish the game had come up with a system for alerting the player to obvious forthcoming encounters, or had at least offered a "buffing round" before the battle. I know: I've lodged this complaint many times before.
        
So we're going to skip the parley?
       
The dragon was holding on to the Lance of the Roadwarden plus the Key of Ire. I had found the Key of Wrath in the ogre lair. A message in the lizardman village, which I think is otherwise optional, alludes to these three keys. A door just beyond the dragon had three keyholes, but at this point, we only had two keys.
     
The dragon, incidentally, had 23 pieces of jewelry, 54 gems, and 35,234 platinum pieces in its treasure pile. We could take a small fraction of that. Presumably, someone came along, found the rest, and completely wrecked the local economy.
    
This screen says all that needs to be said about the economy.
     
We returned the lance to Yemandra, lost Tornilee the ranger, got a bunch of equipment as a reward, and leveled up. We were surprised to find that Dazmilar didn't want anything to do with us, breaking the expected pattern. We wandered around Skull Crag until we found Dutiocs and the three children in Dutiocs's quarters. "Morudel has been kidnapped!" they told me. "He was abducted from the heart of the keep in broad daylight." The kidnappers had sent a message that they would return Morudel in exchange for the recovered shield and lance.
    
This whole conversation reminds me of this classic Dilbert cartoon.
           
Yemandra advocated attacking the kidnappers immediately; Kallithrea favored paying the ransom; Dazmilar advocated for engaging in negotiations while simultaneously finding a way to free Morudel. I thought the game was going to give the choice to me, but instead it had Dutiocs go with Dazmilar's plan.
   
The party set out, looking for a new area, and found a deserted halfling village in the southwest part of the overworld map. There were signs that some of the buildings had been rebuilt and extended for larger occupants. Ettins prowled the hallways of many of these buildings; if I played the game again, I might try an all-ranger party given the extra damage they do to giant creatures.  
     
Or maybe we're just peculiarly tall.
      
The boss of the map was a vampire named Keremish. He attacked us with two clerics, three mages, nine evil champions, and four ettins. Fortunately, my cleric went early, and she had a Necklace of Missiles by this point, so the priests and mages never got a chance to cast a spell. We killed Keremish long before he could get up to us and drain anyone.
     
A "Fireball" in memory is saved. But that is not what "Fireball" is for.
      
The harder battle was behind a secret door in Keremish's chambers. The battle featured four mage spellcasters of different types ("theurgists" made their first return since, I think, Pool of Radiance) and three priest spellcasters. They hit us with "Fireball" and "Hold Person," respectively, and did some serious damage before we could return the favor in round two. We won on the second try, though just barely.
    
The enemy layout isn't good for "Fireball." Fortunately, there's "Lightning Bolt."
      
This party had been guarding Morudel, and we got him out of there; amusingly, he appeared in our inventory, the same thing that happens in Legend of the Red Dragon II. Whenever I play two games at the same time, no matter how different they are, they always have at least one odd thing in common.
    
I hope those keys aren't bothering you too much, Morudel. Just stay hidden.
      
We had a celebration once we got back to the keep. After that, things progressed as I expected, with Dazmilar giving us the quest to recover the sword, and offering us a dwarf fighter/thief as a companion.
   
The sword was in a "labyrinthine" cavern north of the city, occupied by large groups of minotaurs and one group of gorgons that we mercifully managed to kill without anyone getting petrified. Although only 24 x 9, it had a confusing layout, with some squares that wrapped back around to the beginning, and I had to map it. Among the difficulties, there was only one room on the entire map in which it was safe to rest. 
      
My map of the labyrinth.
     
In addition to minotaurs, we started to encounter dark elves. I had just been about to praise the game for not including these tiresome enemies. There was also one battle with driders. The dark elves were led by someone named Xelez-Dar, and the final battle was a two-parter, the first with a bunch of her minions, the second with Xelez-Dar and more minions. The battles were difficult because the Drow had both priest and mage spellcasters, but they were grouped in three or four small clusters in different parts of the map and thus could not be hit at once. My cleric worked overtime casting "Dispel Magic" on their "Hold Person" and "Confusion" spells. As usual, I had to fight the battle once, lose, reload, buff, and try again. I had "Haste" by now, which really helped.
     
Do the Drow not have conditioner?
      
The Drow leader not only had the Sword of the Roadwarden but also the Key of Rage, and the labyrinth had a second door that required a three-part key. (There must have been one in the ogre caverns, but I don't remember seeing it.) I returned to Skull Crag first, dropped off the sword, leveled up, identified my equipment, and so forth. But when no other missions seemed to be forthcoming, I returned to the labyrinth and tried the keys.
   
It turned out that the door connected to a small dungeon with exits into each of the three lairs in which I had found one of the Roadwarden artifacts. I thought that was cute. But there was also a path to a new area. The party kept getting a glimpse of a "shadowy figure" who managed to keep just ahead of us. 
    
Just once, I want to play a CRPG in which you can actually catch up with the enemy in times like this, slaughter him, and avoid the final battle entirely.
    
As we chased him, we were led into a "lava tube" with walls on fire. (That's not really what a "lava tube" is, but never mind.) We were attacked by salamanders, hellhounds, efreet, fire elementals, and fire giants. The developers found a way to include pretty much the entire available bestiary in this game.
      
The lava runs through the tube; it doesn't form the walls. Or make skull shapes.
      
Eventually, the lava tube gave way to a stone dungeon, where a passage led through a one-way secret door, and we found ourselves . . . in the basement of Skull Crag. I guess we should have seen that coming. We fought purple worms, umber hulks, zombies, spiders, and one beholder as we made our way to the stairs. 
    
They could have used this guy in the final battle. Alone, he wasn't so tough.
    
The final showdown took place in the Great Hall, and I'm proud to say we anticipated this likelihood enough to cast buffing spells before we entered. We found Kallithrea, Yemandra, Dazmilar, and Dutiocs talking to a figure wearing the Helm of the Roadwarden, an artifact no one had mentioned before. The man was Vidruand, the eldest son of Arelin, who had disappeared years ago. Now he was standing in front of them, accusing the party of orchestrating all the evil events lately, including the death of Arelin and Vidruand's own kidnapping. "You must slay them, before they kill us all!"
     
To be fair, that was what a couple of us were planning.
       
I rolled my eyes at their gullibility as Yemandra immediately charged us, but I was delighted when Dazmilar tripped her and sent her sprawling to the floor. Dazmilar, of all people—the one I liked the least, the one who was supposedly "honorless"—was the only one who saw through the idiocy of his brother's claim. "What possible motive could they have in giving us mother's arms and rescuing father if their intent was to destroy Skull Crag?" Vidruand tried to make up some ragtime and said he needed the three artifacts to defeat us, but Dazmilar was having none of it: "If these so-called impostors were really behind mother's slaying and your capture, they would already have had all four of the Roadwarden's arms . . . They certainly wouldn't have needed to hold father as a hostage for the return of the arms they gave us in the first place!" I wish there were more player agency in this section, but I do like how it subverts the "idiot plot" of so many games.
    
I didn't like Dazmilar at first, but he was my favorite character by the end.
      
As everyone else in the room nodded, Vidruand lost his cool and attacked with a host of . . . rats? And mobats? Oh, no! Rats have 3 hit points. Mobats are a little tougher, but not final battle material. Plus, we had Dutiocs and the three children on our side. Hemlock, wearing a Girdle of Giant Strength, killed Vidruand in one (hastened) attack. The rest was just mop-up.
     
No enemy vulnerable to "sweep" is final battle material.
       
After the battle, Lunit Bdufe (that's not a typo), the priestess of Sune, offered to heal our wounds, so I knew something was up. Sure enough, as soon as we left this interface, a new threat appeared. The windows of the great hall shattered, and two vampires came drifting in. They introduced themselves as Khulzond and Mordroka. They claimed that they were the ancient rulers of Skull Crag, but that they had been driven out. They had captured and corrupted Vidruand as part of a plot to reclaim the keep.
      
 I feel like we should have had some hint of this. The Forgotten Realms wiki has more backstory on the pair, so maybe I just overlooked something.
      
The vampires resurrected Vidruand and used telekinesis to deliver the Roadwarden artifacts to him, but Lunit Bdufe managed to cast a final spell that caused the items to fly away. Then the battle began: two master vampires, Vidruand, and about three dozen mobats. Again, we had Dutiocs, Kallithrea, Yemandra, and Dazmilar on our side. Kallithrea and Yemandra even briefly appeared in the party as NPCs, although only during cutscenes in which we couldn't act or access their inventory. They were mostly wasted in the battle, as they kept trying to "turn" the vampires round after round.
     
Source for her portrait.
       
It wasn't terribly hard, but the vampires started right up against four characters and managed to drain all four of them for at least 2 levels, one of them for 4 levels, before I could kill them. No one died, however. "Fireball," "Lightning Bolt," and "Ice Storm" took care of most of the horde.
     
The layout of the final battle.
       
After the battle, Lunit Bdufe again offered healing services, including "Restoration," which was a bit wasted since there was no more opportunity to play or save the game.  
   
The denouement started with a great celebration. Morudel then asked us to meet him in his quarters. With his three children all in attendance, Morudel (who I want to keep spelling "Moredhel") announced that: "Not one of my surviving children has the right combination of honor, wisdom, and courage to rule Skull Crag." I thought that was a bit harsh. Instead, he continued, one of us should take the job, apparently forgetting that at least two of us are evil. He left the choice to us.
     
That's a lot of "faithfullies" for these alignments.
      
I tried it both ways, even though I had to reload and fight both final battles again.
     
If we said no, Morudel was disappointed. He left the job of finding a new Roadwarden to Dutiocs—which seems to me like the obvious choice anyway—and announced that he would be returning to his kin in Marsember and his children would be heading out on their own adventures. "This keep is in for some interesting times, and I, for one, intend to miss them," he concluded. 
     
He lost his wife to the job, so I guess we can give him some slack.
     
If we said yes, I had to choose someone to take the role. I chose Ascham the ranger. She was the only good character other than my cleric, and clerics can't wield swords and lances. The choice hardly made any difference. Morudel again announced that he and the three children would be leaving. Each of them wished us well, and Elminster appeared for a final thought and wink to the entire Unlimited Adventures kit. I had no opportunity to save the game before it kicked me to the welcome screen, so if these characters are going to be used in further adventures, it will have to be the versions of those characters from before the final battles.
      
Can I change the title?
       
A few miscellaneous notes:
   
  • We found a single Elixir of Youth, in case I overdid it with "Haste" spells and wanted to make it up to exactly one out of six characters. Needless to say, I never used it.
  • I forgot about backstabbing! Entirely! One of my favorite parts of the Gold Box approach to combat, and I completely forgot that it even existed until quite late in the game. Fortunately, I still managed to get in one or two. 
   
I love it when a plan comes together.
     
  • When you return to Skull Crag during the course of the module, you get a random selection from a database of entries describing current conditions in the city. Some of those entries mention a sign that gives the current population. It went steadily downward between the beginning of the game (around 350) and the end (high 200s).
  
The good old days.
     
  • There's an armory in Skull Crag in which you can buy, sell, and identify equipment. I was kicked out the first time I visited; the dwarven smith told me I didn't have permission to be there. I didn't bother going back until the end of the game, when I was welcomed. I'm not sure where the turning point was. I mostly used the elven village for services (items, training, resting) throughout the game, as they were close together and I didn't have to go to different training halls for different classes.
  • I love how if your fingers slip and you hit CTRL-F6 instead of CTRL-F5, DOSBox thinks nothing of creating a six-hour, four-gigabyte WAV file on your hard drive with no warning. (Yes, I know this can be changed.)
       
My total time on the game was about 13 hours. That's not a lot shorter than the shortest previous Gold Box game I played, Champions of Krynn (1990), which I recorded at 17 hours—although I think that may have been a typo. The point is, it's more than just a "demo game." It tells a complete, competent story, offers a little non-linearity, and has rewarding character development and combat.
    
I don't think I will ever get tired of this combat interface.
     
I think the two vampire overlords could have been foreshadowed better, perhaps with tomes found in the depths of Skull Crag. (There is one note in the burial chamber about a "slumbering malevolence," which is perhaps a good clue.) I wonder if the loss of the accompanying adventurer's journal didn't hurt the game a bit. Although I was advocating for their demise as early as Curse of the Azure Bonds, I can't deny that very long passages of lore lend themselves better to an external source than to on-screen text, particularly since the latter (in the day) was not easily saved for later reference. A few journal passages would have made Skull Crag seem like more of a living place, with history and lore, the way that the original team did for Phlan in Pool of Radiance.
      
This isn't a complaint about "Skull Crag" specifically, but I would have liked a full game to offer more role-playing and encounter options that reflected the variety of alignments possible in the AD&D system. Honestly, hardly any Gold Box game after Pool of Radiance offered such options, which is one of the reasons that this first Gold Box game remains the highest-rated. 
         
Would you say those adventures are . . . unlimited?
         
I have to say a word about the graphics. There is an extent to which all of the graphics in all of the Gold Box games have been conceptual rather than literal. When you encounter NPCs or monsters and you see portraits of them, they are idealized portraits, often copied literally from previous publications, and not necessarily meant to depict those NPCs and creatures in that specific location and moment. A few games have cutscene graphics that are exceptions, but they're rare.
    
This sense of disconnect is much stronger in "Skull Crag" because almost all the portraits are borrowed from other games. Not only am I not seeing Yemandra in any real environment (every time I meet her, she's in her quarters, and yet there are trees and some kind of monolith behind her), but it's not even Yemandra—it's the unknown warrior from the cover of Neverwinter Nights (1990). The portrait is thus meant to "suggest" Yemandra without actually depicting her. All of the graphics in the game are like those "concept trailers" that fans create for nonexistent movie projects using clips from other movies that are meant to evoke a similar tone.
 
Yemandra in the game and her original source.
       
The result isn't anything I hate, but in a strange way, the game basically has no graphics. Their quality is overshadowed by the fact that they do not accurately depict things in this world. Put it this way: If Wizardry, which is almost all text and wire frames, had shipped with a copy of the latest Boris Vallejo art book, and the game had occasionally said, "Turn to Page 26 and you'll get the idea of what Trebor looks like," would you consider that the game's "graphics"? I feel like every piece of artwork in the game should have come with a René Magritte-style disclaimer.
      
It's not even close. The real keep has only one upper floor, not two towers of multiple floors.
             
Aside from these complaints and, of course, the economy, "Skull Crag" was a satisfying adventure that exemplified the kit well. I'll work out a GIMLET for the next entry, but I would rank it above the two Buck Rogers games and almost (perhaps not quite) as equal as the two Savage Frontier games. I look forward to giving some other adventures a try—with all-human parties.
   
Final time: 17 hours