Monday, May 31, 2021

Game 415: Abandoned Places 2 (1993)

 
I always think it's weird when a game has a subtitle but its sequel doesn't. How hard could it have been. "Another Time for Different Heroes."
        
Abandoned Places 2
Hungary
ArtGame (developer); International Computer Entertainment (publisher)
Released 1993 for Amiga
Date Started: 22 May 2021
    
It's been about a year to the day since I started Abandoned Places: A Time for Heroes, a Hungarian Dungeon Master clone that I recall as pleasant but also a bit too easy. Right now, though, I find myself looking for exactly such a game. A Dungeon Master-style game is a nice contrast to Darkside of Xeen; while they may superficially look similar, the nature of gameplay is very different. More important, the "too easy" part would be a nice contrast with Mission: Thunderbolt, which I am still playing, one very slow level at a time.
    
Like its predecessor, Abandoned Places 2 is set in the world of Kalynithia. In the first game, four heroes prevented a demonic sorcerer named Bronakh (given as "Bronagh" in the second game's manual) from rising to power by scouring the land's dungeons for a collection of artifacts, then confronting Bronakh in his fortress. Now, four hundred years later, Bronakh's "creator," an extra-planar being named Pendugmahle, has crossed over to Kalynithia to take revenge. Once again, the Ancient Order of Arbitrion has decided to resurrect four heroes from carbon freezing, or what the game calls their "diamonised state."
    
The opening cinematic shows some kind of creature emerging from the ground and being teleported to the well of a castle. It doesn't make a lot of sense.
    
As with the predecessor (and Dungeon Master), you don't create the party so much as choose from a roster of 34 existing characters. But you can change most of the defaults, including the five attributes (strength, intelligence, wisdom, dexterity, constitution) and name. You can allocate attributes from a pool of points, though in a way that makes little sense. It takes 1 point for each increment from 1 to 7, then 2 from 7 to 8, then 1 again from 8 to 9, then 2 from 9 through 13. Going from 13 to 14 takes 7 points, and 14 to 15 (the maximum) takes 9. You could give everyone 13s across the board (with two 14s) or sacrifice a lot of points for more 14s and maybe a 15.
 
There are only two character classes: fighter and mage. The original had clerics, but in this game, clerics are just mages who specialize in a particular magical sphere. For mages, you cannot change their starting magical abilities. There are three magical spheres: cosmos, elemental, and necromancy. The manual says that necromancers are best at healing spells, which is a bit nontraditional. "Conjurers" (who use the elemental sphere; keep up) are good at attacking spells, and "voiders" (cosmos) are balanced. The original game forced you to play two fighters, a mage, and a priest, but this game makes no restrictions. I chose one fighter and three mages, one each of the three specialties. I gave them names that help me remember who they are, because that's becoming more of an issue.
         
Creating a new "cosmos" mage.
       
The characters begin with no equipment in a small room. The square leading out of the room has a text encounter in which we're told that the "master" who awakened us suffered some sort of injury or weakness from the ritual and needs a healing elixir, to be found somewhere in the same dungeon. Right away, we see something that the first game didn't offer--messages or mini-encounters triggered by specific dungeon squares. This was a feature of Eye of the Beholder, but I don't know if the Abandoned Places authors took from Eye directly. 
      
We get our first quest.
      
The game window has been redesigned since Abandoned Places. The first one arguably tried to cram too much on one screen. This one is simpler. The view window is about twice the size of the original, and the character portraits (including combat actions) are now below the window. A pane to the right is used for inventory and spell selection (alternating between the two with a right-click), with a compass and a GTFO panel to the lower right. If you need to see the full character sheet, you can toggle it on and off (it replaces the view window) with the SPACE bar. My assessment is that graphics have been improved since the original; this one offers such interesting visuals like grates and artwork that I assumed at first they must be interactive.
      
This grate and this relief are so intricately designed that it feels like you ought to be able to do something with them.
      
It took me about three hours to map the first level--a large 31 x 31, using the "worm tunnel" approach, with space between all adjacent walls. These are the moments I cherish in RPGs, setting out with no equipment and a blank piece of graph paper, slowly learning the game's conventions, taking what the game throws at you, one square at a time. It occurs to me again how integral mapping is to my enjoyment of this type of game. There are times I don't feel like doing it, or am not in a good place to do it (my process really requires two monitors), and at those times, I should probably just play something else. 
  
There were only two enemy types on the first level--skeletons and skeletons wearing some kind of armor. As with any Dungeon Master-derived game, combat is in real-time, and is largely about right-clicking on your weapons and then waiting through the "cool down" period before you can do it again. The one oddity here is the way the game handles spells. The right-hand panel allows you to browse through your available spells and cast them, but to make things quicker, you can set an "active" spell that gets cast automatically when you right-click on a spellcaster's empty hand. Right-clicking on a fighter's empty hand just makes him punch with that hand. 
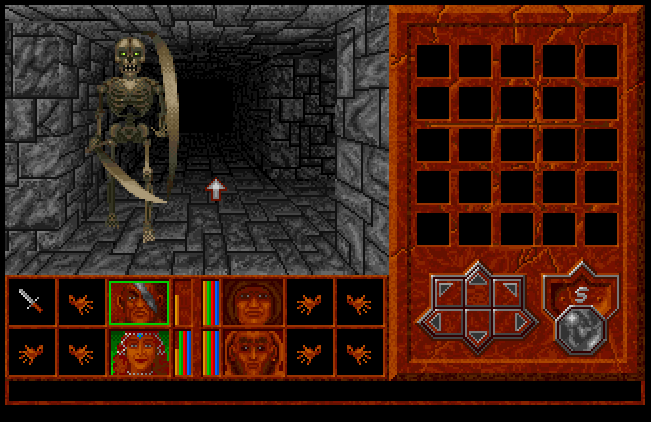
      
My first combat.
    
I thought this would be confusing, but I got used to it quite quickly. It turns out that the game--or, at least, the first level--is well-suited to a mage-heavy party, as spell points regenerate fast. If you run out in a particular combat, you just need to retreat for half a dozen squares to regroup. My voider started with "Magic Missile" and my conjurer started with "Meteor Swarm" (which sounds like a much higher-level spell), both of which performed well against the skeletons. My necromancer didn't have an offensive spell to start (except "Sleep," which I assume didn't work on skeletons), leaving him to clean up with "Cure Light Wounds." My only complaint is that when you fast-cast the spell by right-clicking on the hand, it assumes you want to cast it on the necromancer himself. Only by casting it from the book do you get the option to target a specific character.
   
All four characters can attack enemies--none of this Dungeon Master nonsense where it's limited to the first two (or, worse, the Captive nonsense where if you attack with the two rear characters, they actually hit the first two characters). It seems that if you're making a melee attack, it doesn't matter if the enemy is on the left or right side of the view window. But if you're casting a spell or using a missile weapon, it does matter, so it's important to have one offensive mage on each side of the screen.
    
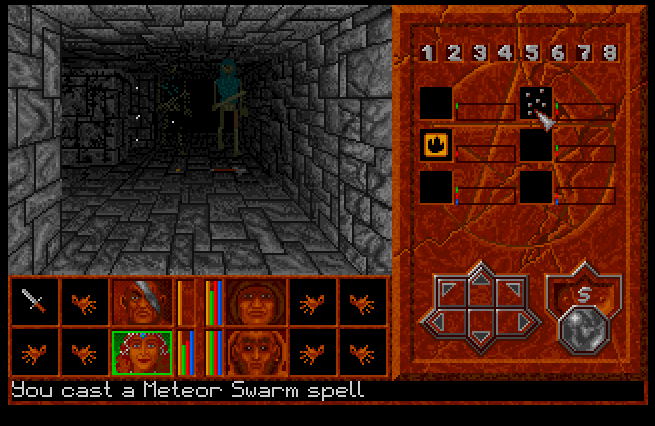
A "Meteor Swarm" dissolves a skeleton to the left as another approaches on the right.
       
I can't give the game an A+ in its use of the keyboard, but it's not bad. The movement panel is mapped to the numberpad, and you can select characters with the 1-4 keys. SPACE toggles the character sheet. Beyond that, however, there isn't much keyboard redundancy. I would have liked a key (TAB, maybe) to switch between the inventory and spell panes, and of course I'd always prefer keys to execute attacks in combat.
   
As with its predecessor, characters earn individual experience, but based on all successful actions rather than just killing enemies. They get experience for each successful hit and each spell cast, including non-combat spells. That said, killing enemies does seem to deliver the most experience, and by the end of the level, there was a significant imbalance. Oddly, the imbalance didn't favor my fighter (7,511 experience), but my voider (23,538), who always seemed to nail enemies with his spells. My conjurer ended with 9,548, and my necromancer with a paltry 4,534. This translated to Level 4 for the voider, Level 3 for the fighter and conjurer, and Level 2 for the necromancer.
   
One of my criticisms of Abandoned Places was that it didn't trot out any puzzles until quite late in the game, when it not only introduced them suddenly but made them incredibly difficult. This level suggests a greater use of easy to moderate navigation puzzles. Among the things that I mapped include:
   
  • "Dark" squares for which you need a torch or "Light" spell.
  • Magic missiles that speed along corridors and hit you unless you time them carefully. I haven't yet determined if these damage enemies.
  • Button doors. You can't smash enemies in them, alas.
      
The doors have a pretty funky design.
         
  • Squares with fire. I assume some spell allows you to walk in them, but I don't believe I have it yet.
      
Why would these even exist?
         
  • Water squares. You need "Levitate" to cross them. My conjurer got the spell at Level 2. I don't know what you do if you don't have someone capable of casting "Levitate," but then again, I don't think anything absolutely necessary was on the other side of those squares.
      
Getting ready to cross some water.
      
  • Pressure plates that lower walls.
  • Illusory walls that you just walk into.
  • Manual buttons that lower walls or pillars. I had to make a couple of loops through the level before I even spotted one button type; it strikes me as a bit unfair.
      
That tiny thing above my cursor is a button. At least now I know to look for it.
      
  • Magic-draining squares.
  • "Slick" squares that slide you to a destination square. "Levitate" doesn't do anything to counter them.
  • Spinners. The first level had one, and it keeps you spinning constantly until you step off.
          
It took me a few tries, but now that I know what to watch for, I think I'll be able to map further levels a bit faster.
   
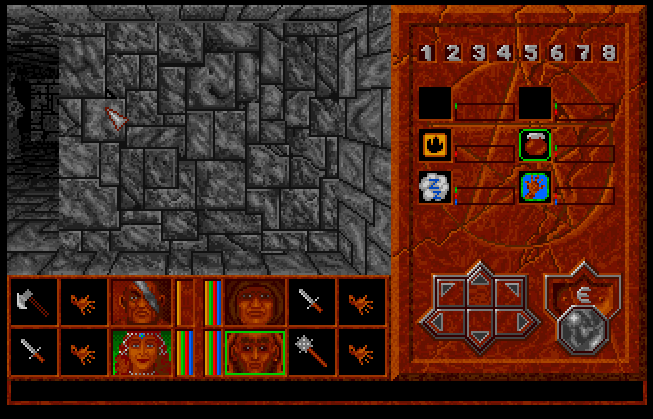
There were maybe half a dozen treasure chests, and between them and items found on the floor, my inventory has grown rapidly. I need to experiment more with inventory items. So far, I've found:
   
  • Weapons: long sword, axe, dagger, two maces, two clubs, three short swords. Only the fighter can use the axe or long sword. The game gives you no information about damage, so you have to guess. Even in combat, your only feedback is visual.
  • Darts. The problem is, if I equip them, I can't cast spells from the same hands until the darts are gone. I think I'm going to make this one Dungeon Master clone where I don't waste half the game running around picking up missile weapons. I'll use my spells and melee weapons and that's it.
  • Piles of coins. You "use" these (put them in a hand and right-click) to convert them to your "money" statistic.
     
Opening a treasure chest. Only the items in the six "holes" are interactive. The skull, sword, potion, book, and chalice are all just decorative.
      
  • Scrolls. Any spellcaster can use any scroll, even if they don't have the related spell. Still, it's hard to think of a situation in which they'll be really necessary. Maybe if there's an entire area where regular magic doesn't work.
  • Staff of Water. Casts the "Globe of Water" spell, a missile spell. 
  • Food. More on that in a bit.
  • Burning oil. Casts like a spell and causes a fire square to erupt in front of the party. I haven't tried it in combat yet, but it seems cool.
  • Torches. There were only a couple of squares on this level that required them.
  • Gems and rings. I assume these are to sell later.
  • Rope. No use yet, but I'm sure some later puzzle will require it.
     
I've found only one item to go in the character's "fixed inventory," found on the character sheet. This is where you put wearable items that aren't going to change very much. I found one suit of leather armor, which I gave to my voider.
    
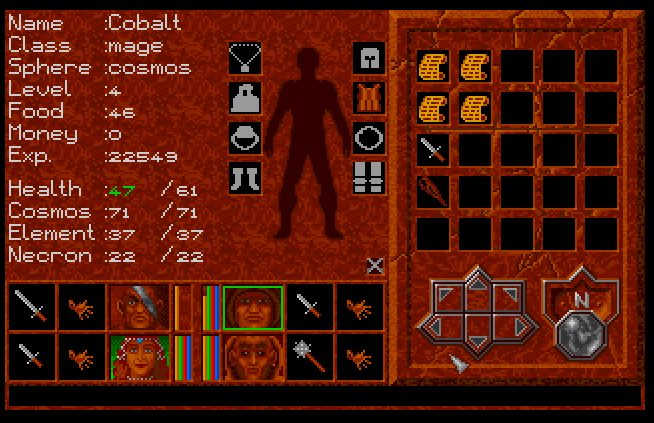
The character sheet shows the more permanent wearable items.
        
You supposedly have an encumbrance statistic to go with all this inventory, with over-encumbrance causing slower attacks, but it seems to be invisible.
       
I'll close this first entry with a couple of major annoyances. The first is the food system. Your characters have a "food" statistic, and if it runs out, they start going hungry and taking damage every couple of seconds. This started about 10 minutes into the game. Fortunately, I discovered that spell points regenerate fast enough for the necromancer to keep up with the hit point loss by casting "Cure Light Wounds." I just had to listen to all my characters yell "Hrugh!" with hunger pains every few seconds. The only items of food I found in the dungeon were "badberries," which seem to poison you instead of replenishing your statistic. Eventually, my conjurer leveled up and got "Create Food," and by the end of the level, all three of my mages had it. Each casting creates one food item that you can right-click to eat, restoring your nutrition. Thus, the need for food is easily solved, making the entire system just an annoyance, requiring us to stop exploration every 10-15 minutes for a round of fish and cheese. I don't mind a food system when it adds to a game's strategy, but it's silly to include it and then trivialize it.
       
This is just an image of a pillar that I thought looked cool.
       
Incidentally, I twice had to take a break while gaming, forgot to put it in "pause" mode, and came back to find all the characters dead from starvation. I don't mind real-time combat in tile-based games, but nothing else should be real-time. It punishes players who map.
    
The second problem is the game's sound. Technically, it's quite good. When enemies are near, you can hear them walking, and you can also hear sounds like the roar of fire squares. The sound designer managed to include echoes and the creative use of stereo to indicate the direction of the enemy. The major problem is that when the game begins, there are so many enemies around everywhere that you're constantly listening to what sounds like a herd of horses in the next corridor. I wouldn't have minded a bit more subtlety.
   
One thing that doesn't annoy me much but probably annoyed some era players is the speed of saving and reloading. Saving takes 1 minute and 25 seconds. Reloading requires you to first quit to the main menu, which requires a disk swap, and then hit "Continue an Old Game," which requires another disk swap. At that point, loading takes about as long as saving. All told, you're looking at about 2 minutes to reload, which you have to do after each character death in the early game. Fortunately, the game isn't that hard, and I rather like that there are some consequences to death. I'm always saying that modern games should artificially increase their reloading times so that the player is more incentivized not to die. (And yes, I know there are ways around the speed issue with the emulator; I try to avoid these unless the game is unbearable otherwise.)
    
My map of Level 1 so far.
    
As you can see from my Level 1 map, there's a blank area that I couldn't access. The game seems to be eager to take up all its available space (within the confines of worm tunnel design), so I suspect that either I missed a button, or that area is going to be accessed from another level.  
    
I spent a little time exploring Level 2. "Put your weapons here and receive a bonus fireball," a message offered soon after we arrived. There was a pressure plate nearby, but it wasn't clear at first that we were to put our weapons on the pressure plate, not on the square where we got the message. It turned out that once three weapons were loaded on the pressure plate, it lowered a secret wall nearby. I never got a "bonus fireball."
      
Weighing down a pressure plate.
      
A corridor offered a devious spinner (the type that makes it look like nothing has happened) and ended in a room that, according to a message, was called the "sauna." It cleverly had a fire square next to a water square, and a "slick square" trap forced us to traverse both before dumping us on the other side. At the end of the area, we stepped in a teleporter. I started to map the subsequent area, but it looked familiar, and I realized that we were simply back in the northeast corner of Level 1. The only other way to go on Level 2 leads to a down stairway, so either Level 2 is really small (15 x 12) or once again, we're going to find alternate stairways.
    
I'm curious to find if the sequel has the same approach to its overworld, towns, shops, and so forth as the first game. I guess I won't know until I find that elixir and get out of the starting dungeon. On we go.
    
Time so far: 4 hours

Friday, May 28, 2021

Darkside of Xeen: Th Thr Twrs

I'm not sure this is quite the honorific the authors think it is.
        
The Great Eastern Tower was a confusing maze of stairways and the occasional teleporter, but the monsters were easy. Most of them were mystic mages, and their electrical attacks couldn't even damage us with "Day of Protection" going. They died in one hit. There was a gamma gazer higher in the tower, but even those aren't much of a threat at this point.
    
This is opposed to those other scientifically-grounded mages.
       
Other than monsters, the tower was chock full of stuff. I found the Jewel of Ages and two energy disks. A "Fountain of Minimal Abilities" did nothing for us, but I suspect it raises your attributes to a minimal number if you haven't already crossed it. I should have visited here earlier in the game. There was a fountain that raised us +1 level in exchange for 50 years of our lives, and a book that gave us +5 levels but wiped out all of our secondary skills. Both were easily repaired by dropping a "Lloyd's Beacon" and teleporting back to the Clouds side. In the first case, I ran the ring of druids again and lost those 50 years. In the second, I took a mirror to Shangri-La and paid 100,000 gold (per character) to learn all the skills again.
    
A Book of Fantastic Knowledge gave 50 intelligence to my sorcerer, who already had a lot of intelligence, so that was odd. The only mystery was a mirror that "didn't respond"--which, when you think about it, is normal behavior for a mirror.
     
Like, if your daughter came running up to you and said, "Daddy! My mirror's not responding!," you'd think something was wrong with your daughter, not the mirror.
        
I returned the jewel to Thaddeus the Fountain Keeper, who said it restored the waters of the fountain, so now we could drink from it to remove magical aging. I guess I could have saved myself the trip to the druids. Now that it's so easy, I probably will never get magically-aged again.
    
I decided next to finish clearing the maps, starting with A1. It was a volcanic hellscape full of gamma gazers and lava dwellers. I used the multiple gamma gazers to try out a variety of spells, but honestly, physical damage seems to carry the day in this game. I use my sorcerer mostly for "Day of Sorcery," "Jump," "Teleport," and "Lloyd's Beacon."
         
Three at once is a little dicey, even for my party.
      
In the far corner of the map, we found a fountain that raises hit points by 2,500. This definitely goes on the buffing list if we need it. Not long after, we found a +100 might fountain in D1.
     
It might be worth setting up a "Lloyd's Beacon" right here.
       
In the middle of the lava was Castle Alamar. Even though it seemed premature, we entered, only to be stymied by gates. My ninja couldn't pick them and my two front characters couldn't bash them. I made a note to "return when stronger," but that seems to be a silly thing to write at this stage of the game.
   
I moved on to C1 and soon discovered that, although it wasn't on my list, I had also not explored D1. I did them both together in long east-west strips, moving north. C1 had numerous battles with griffins. They die in one hit but are fast enough to go first, and they concentrate all of their attacks on my knight. D1 mostly had giants. I burned a couple of their lairs. But when I met Guradel the Giant on his couch of snows, he was friendly enough. He said that Alamar intends to "move Xeen away from the sun so that he may return to the world he came from." Even now, Sheltem's mind is still bent on Terra. He also gave us two energy disks.
       
Dialogue options when speaking with Guradel (le guard?).
       
We were now up to six energy disks, so we returned once again to Ellinger. He took them and said that Castle Kalindra is now fully restored. He said we should get the key to the Great Pyramid and take the Orb of Pharaohs back to the Dragon Pharaoh. Then, claiming that "other matters require [his] full attention from now 'til the completion of the prophecy," he took off.
    
The last level of Castle Kalindra to open was the third. It had a full set of services, including the first trainer I've found capable of training above Level 50. I got my characters to 58, but that brought me down to about 1 million in the bank, and I decided to save more training for later, after I figure out the financial situation.
      
In this universe, whether you contract or retain vampirism is just a matter of willpower.
      
The other side of the level had Kalindra's bedchamber with her crown, some barrels that increased might and personality by 10 (permanently), and a dial that let me re-activate the mirror portals. So far, the only one I've seen is in the Great East Tower, though. With the crown, we returned to the dungeon of Castle Blackfang. Wearing the crown was somehow enough to reverse Kalindra's vampirism, and she gave us the key to the Great Pyramid before flying home.
   
Next was the Great Northern Tower, which we had found in D1. Bosco the Dwarven King, camped outside, had given us the key and asked us to find the Chalice of Protection within, as a seer told him he would die from drinking poison. The only enemies in the tower were slayer knights, who die in one hit.
       
They look pretty tough, though.
      
A statue in the lobby proclaimed the slayers as members of the "Order of Voweless Knights." So began a shtick that if I didn't know it was from Might and Magic, I almost certainly could have guessed. Seven alcoves held books containing familiar phrases without the vowels. We had to type in the missing vowels, earning 500,000 experience points for every solution:
     
  1. H wh lghs lst lghs bst
  2. Lt slping dgs l
  3. Th nds f th mny twgh th nds f th fw (one of the series' billion Star Trek references)
  4. Lv f mny s th rt f ll vl
  5. f wshs wr hrss bggrs wld rd
  6. fl nd hs mny r sn prtd
  7. Dnt lk gft hrs n th mth
         
This answer is, coincidentally, Hawaiian for "tuna sandwich."
       
A couple of them gave me pause, but overall I thought they were pretty easy. I was disappointed to find the solutions under beds on the top floor. Players should have to work through these on their own. The only one that gave me any trouble was the fifth, and this is because the authors apparently think beggars is spelled with a second e instead of an a. In the final alcove was the chalice that Bosco sought, and to get it, I had to type, predictably, AIE, the missing vowels in CHALICE. Bosco gave us 1 million experience points and 100,000 gold pieces.
   
Also in the tower were a set of five thrones. Four of them were labeled "Emotion Throne" and gave my characters some kind of negative condition--depression, insanity, and so forth. But the fifth, the "Euphoria Throne," bestowed 2 levels and 5 bonus points to each attribute if I had sat in the previous four.
    
We emerged from the tower on the skyroad and decided to take it to the Great Western Tower. We were attacked by griffins as we made our way west. We soon came across a wagon occupied by the "Merchant of the Elements." "Between air and earth I constantly travel; a simple clue to unravel," he offered. This puzzled me for a while. I tried several options before finally getting it right with (DUST) for 250,000 experience. As you'll see, I was later asked for what is "between" earth and water, water and fire, and fire and air (there were no riddles for fire-earth or air-water). I got them all right, but the logic differed a bit among the answers.
    
That's not really how mixing elements works.
         
"Danger! Mega Dragon," a sign proclaimed a bit farther along. When we failed to encounter it, I backtracked and noticed a platform floating south of the walkway. We teleported to it and were soon all dead at the hands of the mega dragon.
   
Nonetheless, I was slightly encouraged. We'd at least been able to hit it, which is half the battle. I decided to use the opportunity to try the Ultimate Buff: +15 levels from the shrine in C2, +100 resistances from the fountain in B1, +100 might from the fountain in D1, and +2500 hit points from the fountain in A1. These of course have to be done in one day, with plenty of time left over for the battles you want to fight.
       
Even towards the end of this session, this still increases my effectiveness by 20%.
     
A key question was whether the mirrors that I re-activated work like the mirrors on the Clouds side--specifically, whether they can take you to miscellaneous towers, dungeons, and map features in addition to towns. It turns out they can. After some experimentation, I discovered that the following sequence works best:
    
  • Just after 05:00, cast "Lloyd's Beacon" in front of a magic mirror (I used the one in the Great North Tower).
  • Take the mirror to the DESERT OF DOOM in C2. 
  • Cast "Teleport" three times to get to the +15 level shrine and use it. Cast "Day of Protection" and "Day of Sorcery" any time afterwards.
  • "Lloyd's Beacon" back to the mirror and take it to CASTLE ALAMAR in A1.
  • Cast "Teleport" twice to get to the +2500 hit point fountain and use it.
  • "Town Portal" to NECROPOLIS in B2. Three "Teleports" gets you to the fountain in B1.
  • One final "Lloyd's Beacon"/mirror trip to MAGIC MOUNTAIN, from which it's one "Teleport" and two steps to the +100 might fountain.
     
By this time, it should be no later than 11:00, giving you 18 hours to enjoy the buffs. So enhanced, I returned to the mega dragon and soon got my ass kicked again. The problem is that he has like 65,000 hit points, which would take my buffed characters at least 20 rounds to whittle down. But he has an "eradicate" breath that has about a 1 in 10 chance of working on each character each round. The math is thus against us in the long run--for now, anyway. I made a note to return when stronger.
      
The mega dragon's animation has him fading in and out of view.
       
Reloading, I continued west and made it to the northwest corner of the skyroad. "Fire Zone," a sign proclaimed. There was a patch of lava in the middle of the platform, and a voice asked "what do you seek?" I didn't seek anything, but it seemed logical to say FIRE, so I did. And thus were we dropped into the Elemental Plane of Fire, which I had no idea was even a thing in this game.
    
All I can say is, I couldn't have picked a better time to have buffed with +100 resistance, because the plane was basically a sea of lava, crawling with enemies called fire blowers. A shrine in the north asked if we would "accept the test of fire." I said yes. Nothing seemed to happen except the "heavenly choir" sound effect that usually accompanies a temple healing or blessing. On a throne, someone called the "Fire Sleeper" had this to say: "The Guardian has not informed me of your status as Chosen Ones. Much as I would like to, I am unable to fully awaken." Around this time, we ran out the clock on our buffs, so I returned to the regular world (via "Lloyd's Beacon"; I have no idea how to do it otherwise) and decided to save the elemental planes for later.
         
I think we were here too early.
       
Sky golems harried us as we headed south. Another cart had a second Merchant of the Elements; he wanted to know what travels between fire and air. I got it wrong with ASH and then right with (SMOKE). Shortly thereafter, we arrived at the top of the Great Western Tower. The opening led to a small passage with no connectivity to the rest of the tower, but the passage held a pile of bones with the key. We took it, went back up to the skyroad, fell to earth, and entered from below.
    
The tower was an entirely linear affair in which we carved our way through a couple dozen clerics of Mok, killed the heretical high priest, and retrieved two energy disks and the golden pegasus statuette.
       
I have no idea what race these guys are.
         
With the three statuettes in hand, I returned to Luna the Druid. She rewarded us with +5 permanent levels, which annoyed me, so I reloaded. I'm sick of wasting free levels when I still haven't reached the maximum level allowed by my current experience points. After selling everything I'd accumulated this session, I had about 2.5 million, including what was already in the bank. I put everything there and gave a year of my life to working odd jobs for 50 gold per week. I calculated that at 1% interest per day, I should have about 85 million by the time I was done.
     
Well, I was disappointed. In several ways. First, I forgot that there are only 100 days to Xeen's years, so what was supposed to be one year of work turned out to be closer to four. Second, when I went to check my balance, I only had about 3.5 million. You don't earn 1% per day; you earn 1% per week. I must have just always tested it on the last day of the week, so when I saw it 1% higher the next day, I figured it was every day. And since a week is 10 days in Xeen, and there are thus only 10 weeks per year, your effective interest rate is only about 10% per year. The bank was definitely not going to be my savior with this problem.
        
This was, unsurprisingly, a scam.
      
Sighing, I withdrew about 1.5 million, took it to the trainer in Castle Kalindra, and trained until I ran out, with my party at Level 70. I reloaded and trained with just my paladin and found that she was eligible to reach Level 92. This really annoys me, although I'll save discussions for how much for the end of the game.
   
With my new levels, I returned to the basement of Castle Kalindra and cleared out the dragon mummies, although this got me nothing except more experience.
 
Miscellaneous notes:
     
  • No "Levitation" is required for the skyroad, although you do need it for some of the miscellaneous clouds alongside it.
  • It never gets dark when you're on the skyroad. Between that and the fact that the "Darkside" isn't really dark, and both sides are dark or light at the same times, I have no idea what to make of this world's position in relation to its sun. Perhaps it's an artificial sun like on CRON or VARN, even though the world does seem to orbit a sun.
  • The surface of the world is littered with broken pyramids--the same type that transport you to the Darkside from the Clouds side. I assume the idea is that Alamar broke them.
  • Missile weapons are simply useless in this game. My volley of four arrows never seems to kill the weakest of enemies. 
  • I've talked about my color blindness many times. Oddly, I have no trouble distinguishing the green, yellow, and red used by the health meters beneath the character portraits. Color blindness can be weird sometimes.
     
I finished the session by exploring the rest of the skyroad network, or at least as much as I could. It basically consists of a ring of road that goes around the perimeter of the world, with portals in each corner to the four elemental plains. There are platforms in the middle of the north, east, west, and south sides for each of the four Great Towers. I had to clear out dozens of sky golems, green dragons, and cloud dragons as I made my way around. I was glad to find that I was more than a match for the sky bandits (who turn into cloud dragons when you refuse to pay their 10,000 gold piece "toll"). 
        
A green dragon with a cloud dragon behind him.
       
Studying the automap, I realized there were single-square miscellaneous platforms at various places, and I managed to reach them with very careful use of "Teleport." Many of them had genies in lamps who offered 2 million experience, 200,000 gold, or 2,000 gems. This time, I naturally took the gold. There were a couple of bad genies who offered less favorable options, the best of them resulting in experience but death for the person who rubbed the lamp.
     
"Evil genie" options. The second two result in the deaths of everyone and no reward. If I choose the first one, the character who rubbed the lamp gets killed but also gets 500,000 experience. Death is pretty easy to "cure" at this point.
     
There was a large sky lake in the southern section. It had a few tents where craftsmen offered to make scarabs of protection for gems. These sell for around 2000-3000 gold each, and I suppose it's a very, very long way I could turn gems (of which I have plenty) into gold. There was also a message in a bottle from someone trapped on a sky island in C3 at 7,0. I couldn't figure out a way to get anywhere near this area, but there were a couple of places I couldn't visit because I wasn't worthy to use skyships of the gods. Presumably, the "gods" are in Olympus, and now I'm wondering exactly who I'll find there.
           
Isn't every cloud basically a "sky lake"?
       
I solved the riddles of the last two Merchants of the Elements (MUD and STEAM). Upon reaching one distant platform, I got a message that I'm a "Super Goober." I remember getting a similar message in other Might and Magics, but I can't remember if they were earlier, later, or both.
    
Next time, we visit the Dragon Pharaoh and, I assume, win the game!
    
Time so far: 31 hours

Wednesday, May 26, 2021

Game 414: Tritorn (1985)

 
The game's title is the only thing not in English.
      
Tritorn
Japan
Sein-Soft (developer and publisher)
Released in 1985 for PC-88, Sharp X1, and PC-6001; 1986 for FM-7, MSX, and PC-98
Date Started: 18 May 2021
Date Ended: 20 May 2021
Total Hours: 11
Difficulty: Hard (4.0/5)
Final Rating: 9
Ranking at Time of Posting: 9/417 (2%)
     
The other day, we coined "hydlike" for Hydlide-like games. We need another term for the type of side-scrolling action RPGs that debuted in Xanadu: Dragon Slayer II. "Xanaderived?" In any event, these games share a lot of similarities with hydlikes, but they add chutes and ladders and platforms. As with hydlikes, they walk a fine line between RPG and non-RPG. I just rejected King Kong 2 because it had no character development (except maximum health, which I don't count) and combat was based entirely on action and weapon. Tritorn does a bit better: In addition to health, it has a strength attribute that improves with experience, and that strength statistic determines attack power. The game does not have a classic RPG inventory, but I didn't really become cognizant of that until I'd already spent a few hours on it, and by then I figured I'd just finish it.
   
Tritorn is one of those games that despite being released only in Japan is entirely in English. It was released on multiple platforms, and sometimes in multiple formats for the same platform. The MSX version, for instance, had both a cassette release and a cartridge release. I played the latter, and from what I gather, it's considered the hardest version, with several features not present in its cassette counterpart or on other platforms. I am indebted to this Japanese site for solving many of the mysteries of the game, including a game-breaking bug right at the end. I never would have been able to win without it.
     
The game's opening screen.
      
The framing story is that a demonic knight named Pay-Valusa is threatening the Island of Luwanda. It is up to the hero, Tritorn, to stop his evil machinations. Some sites offer alternate spellings of those names (e.g., "Pei-Barusa" and, amusingly, "Rwanda"), but I'm using the ones that appear in the endgame text. I have no theories on any of the origins, except that "Tritorn" sounds like "Triton."
    
With no character creation, the player is dropped into a maze of 100 screens, each with constantly-respawning enemies to slay. At the outset, he has 200 hit points, 200 strength, 10 magic balls, and a sword. Screens transition to each other on the right, left, top, and bottom, and through various doorways. There are only six game commands to start: left, right, jump, go through a door, attack, and throw a magic ball. Your current enemy's stats are listed in the lower-right block. When you're not fighting anything, this block just says "Sein." This makes sense because aside from whatever foes he faces in-game, a CRPG player's real enemy is the game's developer.
   
You're essentially in combat from the moment the game begins to the moment it ends. I found it very hard. I probably reloaded once per minute throughout the entire 11 hours. Just like King Kong 2, the main problem is that you can't really attack enemies out of range. If you can hit them, they can hit you. There are a few more tricks to exploit here; for instance, they only damage you if they're facing you, and you do more damage with jump-attacks than by standing still swinging. Still, this sort of action-oriented combat doesn't come easily to me. The only reason I stuck with the game was that I had to watch about 8 hours of training videos this week, and I was looking for something mindless to do at the same time.
        
Dragons are tough enemies, but this was a good grinding spot because their breath passes over me until they get to my square, at which point I can hit them.
      
The one good thing is that standing still causes your hit points to regenerate 10 every two seconds. Later, you find a potion that makes this even faster. 
    
A rare screen with no enemies. I just have to avoid the lava and hole in the floor while testing the portals.
     
Every 1,000 experience points, you get another 100 maximum health and strength. The "experience" meter then rolls over to 0 after 1,000, so I don't know why it has four digits in the first place. I had to grind a lot, particularly at the beginning, a process the game discourages by scaling the amount of experience you earn with your level. Eventually, you earn nothing for low-level foes and you have to move on to more difficult ones.
   
In addition to experience, the character develops by finding "inventory" items. I put that word in quotes because they cannot be dropped, used, or equipped. They're basically permanent "power-ups" that provide some new ability or status. You get some of them by killing large numbers of certain creatures, and you find others. The ones you find always tell you what they do. The ones that enemies drop are mysterious, although that Japanese fan site had a rundown. The first item you find is a potion that speeds up your walking speed for the rest of the game. Other items include shields that protect against physical and fire damage, a holy book that protects against spells, and a potion that increases the speed at which you swing your sword.
      
An item awaits my arrival at the bottom of the screen.
     
A few items are absolutely necessary for navigation. There's a key that opens certain walls, a candle that lets you see previously-hidden doors, and a potion that greatly increases your jumping distance.
     
Acquiring the ability to jump higher.
   
The only option you have other than physical attacks is to throw "magic balls," which stun enemies for a few seconds. These go quickly. Eventually, you find some object that allows you to collect magic balls from slain "worms and crows," although the names of the enemies in-game are actually "woams" and "crus." At first, this is capped at 9, but later it increases to 24. These enemies are found in such limited places that you can't become too careless with your use of the balls. Still later, you find a scroll that lets you use the "M" key to cast one of two spells: "Hold," which freezes everything on-screen, and "Flash," which kills everything on screen. These consume magic balls. I only ever cast two or three of them.
    
Navigation is as much a challenge as the enemies. There are ceilings, floors, and walls that you can pass through, so you spend a lot of time looking for secret passages. Even worse, there are a couple of places in which you have to use magic balls or spells to progress, with no hint or warning from the game. For instance, there's one place where you have to shoot three magic balls at a particular rock to open a shaft downward. There's another where you have to cast a "Flash" spell while standing on a rock to open a hole in the floor. It never would have occurred to me to do those things without the aforementioned guide.
     
To get into the doorway beneath me, I have to know to stand on this particular square and cast "Flash."
    
Oh, and there are also lots of dead-end screens from which there's no way to return. Pity the player who saves there.
       
I slowly die in lava.
     
The moments I hated most were the platforming ones. Tritorn isn't a real platformer, in that it doesn't have platforms that move or grow or shrink or whatnot. But an awful lot of gameplay does involve leaping from nub to nub, often having to move or twist in mid-air. Some of the jumps require you to freeze an enemy and use him as a springboard. The constantly-respawning enemies often show up at the worst time to block you from where you're trying to go. There were times I had to save with every inch of progress I made and reload when I fell.
     
The endgame has two parts. The first requires you to slay a fire-breathing dragon. Even though I somehow got there, I wouldn't know how to direct you to his chambers. You have to go right off a particular screen, but that screen normally dumps you in a different place when you go right. The Japanese fan site just indicated there was some kind of "trick" to switching the screens. I'm not sure what I did, but after about 100 tries, using different key combinations, timing, and anything I could think of, I finally happened to wander into the correct screen.
  
The dragon isn't very hard. He breathes a line of fire at regular intervals, and it knocks you off his platform, but you can just wait, heal up, and return to continue the attack.
       
Lurking in the dragon's chamber.
     
Once you kill the dragon, a platform appears under a door that was previously just hanging in the air. That takes you to the chambers of Pay-Valusa, a giant man with a giant sword. He also kicks. To kill him, you have to keep jumping over his head as he changes his facing direction. It took me a few tries, as health does not regenerate in his chamber.

I should mention that in the native MSX cartridge version, you can't enter the final area without the game crashing. Fortunately, that fan site had instructions for hex-editing the active memory so that the crash didn't happen.
       
The screen flashes different colors as Pay-Valusa dies.
        
Once Pay-Valusa dies, the screen flashes and the endgame message appears:
           
The battle of Luwanda Island is over. A courageous man, Tritorn, you win a victory. On the Earth and under ground, you fight. The instant you knocked Pay-Valusa down, various monsters died out. After this, it will preserve peace in Luwanda Island. I have a desire to last it for ever.
            
Just like King Kong 2, Tritorn is not my kind of game. It would be incorrect to say that I dislike action RPGs, but I do dislike them when they offer so few options, and when success is so clearly about the player's fingers rather than the character's attributes. Tritorn doesn't even have any NPCs, clues, or plot interludes to break up the monotony of killing and dying. On the GIMLET, I give it:
      
  • 1 point for the game world. It has a basic framing story.
  • 2 points for character creation and development. I'm counting the inventory bonuses as "character development" here rather than "inventory."
  • 0 points for no NPCs.
  • 2 points for encounters and foes. The enemies are nothing special, but I'll allow a point for the navigation puzzles as a kind of puzzle.
  • 1 point for magic and combat. You aim and swing, and the couple of spells aren't worth anything extra.
  • 0 points for inventory, since I regarded the items you find more as character development. My feeling is that if you can't equip, unequip, use, or drop it, it's not an inventory item.
  • 0 points for no economy.
  • 2 points for a main quest.
  • 2 points for graphics, sound, and interface. It gets all of that for the interface, which, being simple, works well. I found the graphics ugly and the shapes indiscernible. (Other platforms offer manifestly better graphics.) Sound cannot be turned off independently of the relentlessly-repeating music track.
  • 0 points for gameplay I don't like awarding 0 in this category, but the category looks for nonlinearity, replayability, an appropriate challenge level, and appropriate length. None of those factors apply.
        
In fact, I have to subtract a point in the "bonus" category, not just for the bug, but for those couple of puzzles that would have been completely unsolvable without some kind of hint. Again, my understanding is that these are unique to the MSX version, so mentally bump up the final score for other platforms. That final score is 9. Nonetheless, the game occupied me for about a dozen hours of boring videos, and it contributed to our picture of the Japanese RPG scene of the 1980s, a subject for a later special topic.  
     
Sein-Soft (later stylized as Xain or Zainsoft) followed this game with Super Tritorn in 1986 and Tritorn II: Road of Darkness in 1988. Super Tritorn just seems to be a remake with better graphics, but Tritorn II reportedly adds more RPG trappings, like an economy, towns and shops, NPCs, and weapons and armor. (Alas, I don't believe an English patch exists, so I probably won't get to try that one.) Sein must have had a bad experience with that one, because they went back to pure action for their final game, 1990's Valusa no Fukushù.
      
Back we go to another round of regular entries. Let's see if we can wrap up both Mission: Thunderbolt and Darkside of Xeen in this batch.