C.U.: Computer Underground
Canada
Haxoft (developer and publisher)
Released as freeware in 1993 for DOS
Date Started: 26 July 2025Date Ended: 26 July 2025
Total Hours: 2
Difficulty: Very Easy-Easy (1.5/5)
Final Rating: 17
Ranking at time of posting: 148/571 (26%)Final Rating: 17
Whether a CRPG requires combat is an age-old debate, and into it wades C.U.: Computer Underground from Toronto-based author Jeff Marlow. No one dies in this game, but their computer systems do get trashed. The character has a skill level and uncorrupted megabytes of storage space instead of hit points. He battles corporate servers and other hackers.
The game might be fun, and it might be an interesting entry into this debate, if it offered any strategy or gave any insight into actual hacking. But it's far too trite and simple, and its use of technical terms makes little sense.
"Character creation" consists only of a hacker handle. Right away, the game misses some opportunities to explore different types of hackers and give them different goals and skills, or at least to offer a tradeoff between skill and money for a new character.
The character starts at experience level 1 (and therefore a hard drive capacity of 10 megabytes), $150 cash, a communications program called BiteComm v. 0.28, no hacking program, no virus shield, a generic virus, a programmable calculator, and backup media by abacus.
The player's options each round are to:
- Go to "Wired World" to buy or sell computers, backup media, virus shields, hack programs, or communications programs. Each item has an intrinsic level. The computer determines what level of software you can run.
- Crack a BBS, corporate system, or government system.
- Battle with another cracker and try to crash his machine.
- Attempt to hack a bank and steal money.
- Download a new virus.
- Restore lost megabytes of hard disk space (i.e., heal).
- Spend $100 to gather intelligence about another cracker.
Without much effort, you can mentally plug in the analogs for a fantasy RPG. As you successfully crash systems and defeat other hackers, you (somehow) earn money, which lets you buy better equipment, which lets you try the next level.
The game is a little tough at the beginning. Your $150 won't buy even the cheapest hacking program, so the only things you can do that are effective are: a) Battle with the worst cracker, Space Cadet, and earn a few hundred dollars crashing his system, or b) sell your backup program to earn enough to buy the worst hacking program (Trial & Error for $175), then hack the lowest-level entity (Lamer Lounge).
Alternatively, you could try to hack the bank. You have a 1 in 3 chance of getting $999 or less, a 1 in 6 chance of getting $1,000 to $1,999, and a 1 in 8 chance of getting more than $2,000. You have to choose which option you're going for. None of the odds are very good, and if you lose, you often lose your computer, which effectively ends the game. The odds never change. It's not worth the risk for higher-level characters, but a Level 1 player might as well take the chance and start afresh if he loses.
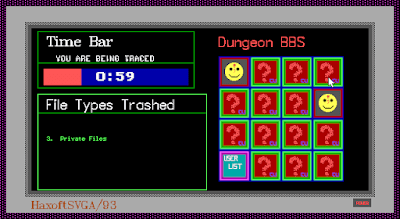
Hacking corporate and government systems is a little fun. You have options like a Dungeon BBS, the power grid, the local pizza shop, a hospital's I.C.U., YBM Computers, and a couple of federal agencies. Your hacking program level has to be equal to the security system of the target computer. If it is, you end up playing a little game of Concentration in which you have to match 8 pairs of cards: user lists, texts, top secret, public files, data files, private files, system files, and system logs. You click on two cards, and if they match, they turn into smiley faces. If not, they turn back over, and you have to try again, remembering where you saw the various options. You're doing all of this against a clock that starts at a generous 90 seconds for Lamer Lounge and goes down to 15 seconds for the federal mainframe. (Failure means getting caught, paying a fine, and perhaps losing your computer or hacking program.) Fortunately, I'm very good at Concentration.
Battles with other hackers are less interesting. Your "megs" are paired against his, and you can do a direct attack with "trash megs" or send a virus over (i.e., cast a spell). Either option gives him the chance to retaliate (his level and your communications and antivirus programs determine these odds). You can try to restore megs from your backup media in the middle of battle, with success dependent upon its quality.
Any person ignorant of computers would get some weird ideas from C.U.:
- Your skill with computers determines your hard drive storage capacity.
- When you transmit a virus to another computer, you lose it from your own machine and have to buy a new one.
- Different types of files can only be deleted in pairs.
- Causing corporate systems to crash somehow transmits money to your bank account.
- "Hacking" is all about directly destroying hard drive capacity on the target machines. That is exclusively what viruses do.
- Computer programs exist on a strict hierarchy from bad to good rather than specializing in certain things.
- Hacking programs are sold at commercial computer stores.
I can't tell you how forward I'm looking to the various "well, actually" comments on each of these bullet points.
Seriously, though, the game is mostly a lot of missed opportunities. What if each target system was a bit different and needed different types of programs and strategies to overcome? What if you had roleplaying options involving things like transmitting money to either charities or your own account? What if instead of playing Concentration, you had to type some actual commands, maybe learn a bit about actual hacking? (Marlow says in the notes that he doesn't actually encourage hacking, so I suppose that's why everything is abstract.) What if you could pay for training? What if instead of getting dossiers on other hackers, you could get dossiers on targets and then use them to guess passwords? There are a lot of ways to expand upon this rather plain template to make it more interesting.
But it is an example of an RPG-like game in which nothing dies, which is pretty rare for the genre. I don't think I've played a game that fit that description since SoccerStar (1989), and I rejected that one as an RPG.
Once you have the best computer (Moon Workstation) and the best hacking program (Code Jaws 8.0), you can try to hack the U.S. government mainframe. You only have 15 seconds to match the eight pairs of cards. If successful, the game proclaims you the "best hacker in the world," which qualifies you for a job at Haxoft.
A secondary goal would be to beat the best hacker, King Krasher, but that's not hard as long as you've leveled up enough to beat his "total megs" (200). You earn $2,000 for destroying his system.
The game uses a mostly-mouse interface, which I find a little annoying. There's no reason that every screen couldn't have numbered items. Obviously, the mouse is the right tool for the Concentration mini-game. There's no sound, and graphics are minimal.
The equivalent of C.U. on the fantasy side would be an all-menu game in which you fight repeated battles and slowly upgrade equipment as you make money—something like Darkwood (1992) for the Mac, for instance. That's fitting, because I gave Darkwood an 18 on the GIMLET, and I give C.U. a 17. It's an interesting idea that needed a little more complexity. At least it's not a German Ultima clone.
****
Please note that I added a supplement to my last entry on The Ormus Saga II, wrapping up that game.


