Sunday, March 26, 2023

Game 489: Quest (1981)

 
Also copyrighted was the game that Quest took most of its ideas from.
      
Quest
United States
Independently developed; Aardvark Software Technical Services (publisher)
Released 1981 for TRS-80 and TRS-80 Color Computer; 1982 for Commodore VIC-20; 1983 for Commodore 64 and TI-99.
Date Started: 25 March 2023
Date Ended: 25 March 2023
Total Hours: 3
Difficulty: Easy (2.0/5)
Final Rating: 13
Ranking at Time of Posting: 68/508 (13%)
      
Quest is a "campaign" game, clearly inspired by Robert Clardy's Wilderness Campaign (1979), though simplified to the point that it's not much fun. It was created by a Robert Retelle and published by Aardvark Software, a mail-order company that released games with such awful production values that I almost suspect it was a front for a money launderer. Among other things, its manuals were in ALL CAPS and had cover art drawn by preschool children. The title screen of this game is another example, although I should note that the TRS-80 Color Computer version, at least, had a more artistic title. This was the only version I could find.
      
A new game begins.
    
A new game starts as soon as the game loads, with no character creation. The unnamed hero's army starts in the northern half of a world divided by a straight river. The entire game world is represented on the one screen. The goal is to reach the citadel of Moorlock in the southeastern corner and defeat him, bringing freedom to the land. The army begins with 10 men, 8 leather jerkins, 7 suits of chain mail, 29 rations, and 108 gold coins. The only commands are the four directions, (I)nventory, (U)se, and redraw the (M)ap. The game is excruciatingly slow at 100% speed, and I kicked the emulator into turbo mode for most of the game.
      
A hairy-legged man in a skirt kneels in front of a computer screen and draws lines in the dirt with a sword.
      
Two cities appear on the map. Other locations--caves, ruins, towers, and special encounters--are hidden until you move the army one square away. I've seen some descriptions of the game that say these are randomized. It's possible that they are for other versions of the game, but the C64 version I played always offered these locations in the same coordinates no matter how many times I restarted. Weirder, hitting the (M) ap command reconfigures the positions of mountains and swamp but not anything else.
      
The cave is too dark. Time to use a lamp.
    
Quest follows the basic "campaign" template. As you move around the map and explore the various areas, your fortunes wax and wane. Friendly armies may merge with yours; enemies lead you into combat. Ruins and towers deliver chests of gold but also occasional combats. You buy rations and supplies in cities, as well as special items necessary to enter the ruins (shovel), caves (lamp), and tower (grapple). "Puzzles," far more interesting in the Clardy game, boil down here to hitting the "U" key and picking the obvious item.
    
Buying items in the store. The offerings change every so often.
     
In combat, success comes down to your number of men, number of arms, experience (gained by winning previous combats), and a "luck" roll made each round. Except for the final battle at the citadel, the game almost always offers enemy parties that are weaker than your own, removing any suspense in combat.
       
Fighting some monsters in a cave.
      
By far, the most significant logistical challenge in Quest is keeping everyone fed. Every 10 moves, the army consumes a number of rations equal to half the number of men. (More in the mountains, but there's no reason to enter the mountains.) When you get to 0 food, a random number of men die when it's time to eat. This has the ripple effect of reducing the amount that you can carry, so you're constantly having to stop to dump equipment after each new batch of soldiers dies.
  
But overall, it's not hard to keep the army on a consistently upward trajectory, particularly since when other armies join yours, they bring gold and equipment with them. In fact, you get so much gold from these encounters that I'm not sure it's even worth searching ruins, caves, and towers. You could just dance back and forth in front of a town and build your army from random encounters.
        
Another group joins me.
    
Eventually, you have to buy a boat to cross the river. Once your army is strong enough, you can make your way to the citadel. The force guarding the citadel has an extremely varied number of soldiers. I initially approached it with about 150 soldiers, and they had 500. When I had 500, I tried again, and they had 800. So I kept playing until I had 800, attacked a third time, and they were down to 500. Their number of "arms" seems to increase in a linear manner throughout the game, however.
    
The cities sell a "siege tower" for 9,999 gold. Maybe you're meant to purchase it before trying to attack the citadel, but I never had anywhere near that much money. I just attacked with a regular army, and it took nearly an hour of mashing the "F" key (for "Fight") before I whittled the enemy down to zero soldiers. Maybe the siege tower would have made this go faster. There were times that neither side lost any men for four or five rounds in a row.   
      
        
Eventually, I killed the last soldier, and the message "HAIL TO THE VICTOR" scrolled down the screen. Yay.
       
You could have at least thrown in an exclamation point.
    
The only mode of character development is in that nebulous "experience" statistic, but even with that, I don't really see "campaign" games as RPGs. Many titles have done much better with the theme, including Avalon Hill's Fortress of the Witch King (1983). I think I even enjoyed Braminar (1987) more.
   
Fellow blogger El Explorador de RPG covered the game and mentioned that Aardvark published a Quest II in 1984 for the TRS-80 Color Computer, Commodore 64, and DOS.  I haven't been able to find any of these. (The generic name doesn't help.) But the gameplay seems to be similar enough that El Explorador covered it in the same entry, so I'll let it go.


Friday, March 24, 2023

Serpent Isle: Mountain King

What was the first time?!
       
The Avatar has been convicted of consorting with the MageLord's mistress. He is exiled to the Mountains of Freedom on the promise that if he finds his way out, he will be exonerated. An automaton greeted me when I arrived.
      
The entry chamber is in a brick building inside a cave running north and south. A sign next to the teleporter says "INMATES MUST WORK," something the automaton said nothing about. He locks himself in a storeroom to the south. The room is full of potions and other items. A door to the east is locked. There's a chamber to the north with three crude beds and some boxes, but its door (leading north) is also locked. Right away, I seem to be trapped.

There are some stacked crates that I start rifling. One of them has an amusing book called Lord British's Tyrannical Adventure, which has the king leering at a wench from the castle ramparts, leaning over, and accidentally dropping his crown in the moat, which apparently doubles as a latrine. For some reason, he decides to jump in after it. The townsfolk hope he'll drown, but he ultimately emerges, reeking of waste. A young boy laughs at him and British takes a swing at the kid, missing and falling to the ground. Now the whole town is laughing. British calls his guards to arrest them all, promising they'll be tortured until they wished they were dead. The end. The Avatar naturally bristles at the inaccuracies. That sounds too competent to be Lord British.
       
At least we know how "Dupre" is pronounced now.
      
I keep searching. I find a watch, fur boots, leather pants, food, and lockpicks. My initial elation at the lockpicks turns to despair when they don't work on any of the doors. Honestly, why is there an "Unlock Magic" spell but no "Unlock" spell? The only thing I can think to do is to wait for the automaton to leave his room and try to slip past him, or attack him hoping to kill him and get his key. But he never leaves his room. I wait and wait. Finally, I reload from before the trial, and go through it again, as I know the automaton leaves his chamber briefly right after I arrive.
   
He closes the doors too fast for me to get past him, so I attack instead. I manage to kill him with my staff. From his body, I loot a Sword of Defense, Dust of Invisibility, and a key, which opens all the nearby doors. Is this really the only way to do this, or did I miss something?
       
I apparently took no screen shots during this entire section except this one where I'm curing myself of poison.
        
I loot the automaton's chamber of potions, food, and money. The north door leads to a room with a "trapper" who immediately attacks. I'm forced to kill him. It's a dead end. A sign on the north wall reads: "ESCAPE IS IMPOSSIBLE." I start hunting for secret doors, and I find one right next to the sign.
      
The entry area turns out to be in the middle of a maze of corridors swarming with giant spiders, skeletons, slimes, scorpions, and hostile humans. Signs on the walls say, "PRESENT GOLD FOR FOOD" and "TRADE GOLD FOR NECESSITIES," but I never find any place to do that. Some corridors teleport back on themselves, leaving you in a never-ending loop in which enemies respawn. The key seems to be to avoid crossing wooden thresholds on the floor. I waste a bunch of reagents on "Cure" and "Heal."
   
Eventually, I've mapped the whole thing and found no way out, so I start searching for hidden doors again and find another one at the south end of the maze. I pick my way into a room where a couple of stone harpies come to life, attack, and kill me in one blow. The monks resurrect me in the same room, and I carefully back out the door. I make my way to another section with non-hostile gargoyles and monks apparently building something (there are piles of lumber). Another locked door yields barrels full of reagents. At last, I reach a chamber with a teleporter, pick the lock, and warp out of here.
          
I want to know how piles of lumber even get delivered here.
        
It takes me to a torturer chamber where a mage is working on a woman's corpse on a table. He shouts, "Thou shalt not have my reagents!" and turns into a bear. After a few blows of my sword, he escapes through another teleporter. I loot his reagents. I'm going to leave here with more than I entered with.
   
On the other side of the teleporter, I see a mage and prepare to attack, but it's not the one I chased in here. It's Stefano, the mage who steals from other mages. I visited his house in Moonshade but didn't find him. He claims unjust imprisonment and offers to join me. He claims to not be a mage, which I believe is a lie, or else I misunderstood something in the last session. He does let on that the woman I met as Selina was in fact a mage named Celennia, expelled from Moonshade after fighting with Frigidazzi.
     
Not really "selling" yourself, Stefano.
        
I accept him into my party, and we move on. We're soon attacked by a lone fighter. When he dies, his sword starts speaking to me! "At last thou has found, me, Avatar." It's the Black Sword! I thought I might find it in this dungeon, since this is where Stoneheart comes from, but I didn't think it would be quite this way. The sword immediately starts complaining: "Thou didst not bind me for service in another land. Thou shouldst release me from my prison to be free again. Wilt thou?" 
       
This is a weak argument, sword.
        
I think about it. Honestly, if he'd promise to confine his destruction to Moonshade, I'd say yes immediately. I ultimately say no, but as we'll see, I wonder what happens if you say yes. The demon warns me that the journey to Serpent Isle has "weakened my hold" on him.
    
On the way to another teleporter, we kill a female fighter who mysteriously has a dead baby on her corpse. She doesn't have a backpack or anything, so either she was carrying it when she attacked, or the game is trying to tell us that she was pregnant. (If you double-click on it, Stefano says, "'Tis tragic that one so young should perish in the dawn of life." I'm not sure that clears things up.
       
You need help, Origin.
     
The teleporter takes us to a large, open room with a throne and carpet. A mage is sitting on the throne, admonishing a minion: "Thou hast failed me for the last time." The minion begs for forgiveness, calling the mage "Lorthondo." Lorthondo kills the cowering man with a ring of . . . fire? Poison? I don't know. The minion either turns into a skeletal dragon or the mage separately summons a skeletal dragon, but either way, we're left to fight a skeletal dragon while the mage warps himself out. He's not too hard. There are piles and piles of skeletons behind the throne. This is a strange place.
      
Skeletal dragons and nightmares. It's like the developers said, "#@$% it; let's just go full D&D."
     
East of the "throne room," we find a room with a bunch of chests, most of them trapped. After taking damage from a couple of them, I experiment with both "Detect Trap" and "Destroy Trap" from the spellbook. They work well, but I hate to waste the reagents. In this game, some trapped chests only affect their immediate area, which means you can safely open them from across the room. Others cause the explosion, poison, or whatever to hit the Avatar no matter how far away he's standing. I'm not sure how you can tell which is which or why there's a difference in the first place. Anyway, the chests provide numerous pieces of magic armor and some scrolls. There's another Firedoom Staff, too, but I don't take it.
    
The chamber has two levers. A nearby sign helpfully hints: "TEAMWORK ENSURES LIBERTY." I go to pull one while Stefano pulls the other--I guess if you don't take him as a companion, or he dies, you're stuck--and together they activate a teleporter. A couple of skeletons appear but die in just a couple of swings.
   
This is a little dramatic for pulling a couple of levers.
         
In the destination hallway, we find a horrific sight: a dozen or so bodies surrounding a teleporter pad. Heads and limbs are scattered throughout the room and hallway. I figure the pad is dangerous, but it only takes us back to the throne room, so I don't know what all the bodies are about. Maybe it didn't go anywhere until we activated the other one.
      
Between the sex, gore, and dead babies, this game would have an "MA" rating today.
      
In any event, there's an alternate path by casting "Telekinesis" on a winch that lowers a bridge. The game had us find three "Telekinesis" scrolls before this point, so it would be hard to screw it up, but I suppose not impossible.
        
The toughest puzzle in the dungeon.
    
We come to a room with 12 levers, each of which (or most of which) open one of the metal doors leading to a bunch of small cells. There are plaques all over the walls. I realize at some point that casting "Translate" will allow me to read them in plain English instead of puzzling out the Britannian script, although after almost a dozen Ultima games, that doesn't really save me a lot of time. 
        
This area doesn't make a lot of sense.
        
My notes are a bit sketchy here, and I reload several times in this area while trying to figure things out and find the optimal order. The ultimate goal is to open a pair of double doors to the south. I think the optimal sequence goes like this:
   
  • We open a room containing a woman sleeping on a slab. "Please help me," she says. "Lead me to my nightmare." (All 'dialogue' in this area is on the main screen, floating above the NPCs' heads. Double-clicking on them to talk does nothing. Usually, the game does this only for incidental, unimportant utterances from NPCs.)
  • The woman's request makes more sense when we realize that the black horse sleeping in the southeast cell, surrounded by flames, is a D&D-style nightmare (a demonic horse) making its appearance in Ultima for I think the first time. We lead her to the cell and open the door. She beseeches it to wake up and offers it a carrot. It rears up, lightning strikes, and the nightmare disappears while the woman falls down dead.
         
Did the lightning kill the woman or did the nightmare? Did the lightning teleport the nightmare?
         
  • The woman's body has a key and a carrot. The key opens a chest in a nearby room full of crates. The chest contains even more carrots and a note. The note explains a little more. It's written to an "old man" by the owner of the nightmare. The note promises to free the old man from the dungeon if he'll care for the nightmare and keep Sabina away from it. "I fear that she doth frighten him." It also warns him to take care "for one strike of [the nightmare's] hoof could kill an old fool such as thou." Finally, the note asks the old man to take care of "my small furry prize" by placing a carrot on its golden plate once per day.
  • The plate in question is in a western room where a rabbit hops around, though the note warns that it's more than a rabbit. The plaque outside reads: "ENTER AT THINE OWN RISK." Placing a carrot on the plate somehow causes a woman (labeled "wench" by the game) to appear. She thanks us and leaves us a "reward": a bouquet of flowers. At first, I thought the rabbit turned into the woman, but the rabbit is still in the cell after she leaves, so I don't know what happened.
      
I'm not sure I deserve a reward for putting a carrot on a plate, but I won't complain.
        
  • In the cell south of the rabbit is a ranger crying over the body of his dead wife or lover. "I'll never forget thee," he says repeatedly. "Thy life was my life. What have they done? They shall pay!" He doesn't acknowledge my presence until I put the bouquet of flowers next to the woman's body. "I shall repay thy kindness," he says, before walking to the levers and fixing one that was jammed. He then says, "Now I can rest," turns into a skeleton, collapses, and disappears. I'm not sure how anybody "paid."
  • Side note: a barrel in the ranger/woman's room contains a dead child. The body has a gavel, a whistle, a magic orb, a Ring of Regeneration, and 3 guilders on him. Using the orb shows it to be a Magic 8 Ball. 
        
Maybe we won't tell the ranger about this. He seems to have enough to deal with.
     
  • The unjammed lever opens a cell with a tree and a teleporter pad. Walking into the cell takes us to an outdoor area. Walking too far in this area just returns us to the cell. There's a blue lever in this area. Pulling it and one of the other levers opens the double-iron doors that lead to the exit.
  • There's a final lever that produces the message "that did something" when you pull it, but I have no idea what it did.
        
There are other rooms containing trolls, skeletons that turn to pikemen, and animal bones and rats, but nothing important.
   
South of the chamber, we find a locked door that opens with what I think is the first key I got when entering the dungeon. You definitely don't want to drop keys as you use them in the Mountains of Freedom. I think half the doors open with that first key.
    
A firepit conceals a teleporter that takes us to another set of caves. An automaton sells food and healing. We kill him and loot his storeroom. A nearby room has a puzzle that requires us to stack crates to reach a bell, which ultimately teleports us to another area with more teleporter pads. Honestly, this whole experience is really dragging at this point. I think there's another endless corridor and secret wall in here at some point, but I lost track of the order of things.
     
This engine does many things well, but I'm not a fan of having to nudge my characters up stacks of crates.
        
There's another automaton selling potions, and he tells us that he has the key to the exit. We kill him without too much trouble. I haven't been mentioning potions, but the dungeon has been pretty generous with both potions and scrolls, and I've been using them liberally to restore health after combat. I even used "Sleep" and "Poison" potions on a nonsensical trio--goblin, monk, jester--who attacked towards the end. I probably could be making better use of the spellbook--it occurs to me late in the session that the "Create Automaton" spell would have come in handy--perhaps you don't need Stefano with you if you use it--but the combats haven't been difficult enough to require it.
   
The final door opens not to the last automaton's key but to the first one's. Lorthondo confronts us in the final cave and blocks the way back. As he casts spells at the two of us, the demon in the Black Sword speaks up: "Thou doest not possess the skill or power enough to overcome the madman Lorthondo thou must face . . . Free me and I shall help thee win free of this place!" 
        
I just love when a game gives me no choice and then calls me a "fool."
       
I refuse and Lorthondo kills us. I try again with the same result. Clearly, this moment is scripted to force me to do what the sword wants. I finally give in. "Free! Free! Free at last!" the demon gloats. "Thou art a fool, Avatar! Thou hast no idea what thou hast lost! I thank thee for thine ignorance." But he adheres to the agreement and blasts Lorthondo with a spell that leaves body parts smoldering around the room.
      
The end of Lorthondo.
      
(You are wondering what happens if you free the demon from the sword when he asks earlier. I replayed most of the damned dungeon to find out. He gives you the same speech when he departs, but he still shows up to kill Lorthondo when you reach the mage.)
    
A final teleporter brings us back to the teleport pad in Moonshade's "city hall." Stefano thanks me and departs, saying he'll be there if I need anything. Decent guy for a thief. My equipment waits in a chest next to the pad. I'm not sure why my companions just didn't take it.
      
This is going to take a while.
      
Speaking of my companions, I desperately need to sort out my inventory--the stuff I brought from the dungeon, my old stuff, and the stuff that Stefano dumped on the floor before departing. I need my companions for this, but I have no idea where they are, so I start hunting around town. I'm 100% sure I'll find Dupre in the tavern, and I do, but on the way I notice Boydon working in Ducio's shop. When he rejoins the party, the game forces him to take on the snarky dialogue that another party member is supposed to deliver.
       
Seeing no other party members, Boydon kindly does his own heckling.
     
Iolo is working with Gustacio to figure out the lightning storms. Shamino "hath gone into the woods to hunt wild game," says Dupre. I figure I'm going to have to spend hours searching for the ranger outside the city, but no, Shamino is so dumb that he thinks the copse of trees inside the city walls is "the woods."
         
"And if I had thought thou would not return, I'd still be waiting here at this establishment."
           
Shamino relates that after I was tossed into prison, Frigidazzi met with him and expressed remorse. She gave him three things to give to me: a scroll of "Chill," a serpent earring, and a note. When I receive the earring, and apparently put it in, an image of a serpent appears and says, "Welcome back." I don't know what to make of that. The note, meanwhile, is both an apology and love letter. She expresses remorse for causing the Avatar to get arrested but also says that memories of the night won't leave her. Oddly, the note mentions "earrings," plural, while I believe Shamino only gave me one. 
    
Thanks, I guess, spectral cobra thing.
         
It takes me about an hour to put my party back together and get the inventory sorted out. After that, it's time to kill Fibercio, but of course the MageLord is nowhere to be found. I have to be content with looting his chambers.
    
There were things to like and things to dislike about the Mountains of Freedom, and I feel they cancel each other out. I feel like the developers could have taken two approaches with the dungeon:
 
1. An authentic puzzle dungeon with lots of riddles, mechanical puzzles, and other attempts to bring Dungeon Master-style gameplay to Serpent Isle's interface. 
   
2. A strong thematic dungeon full of backstory, lore, and role-playing choices like the one in Ultima Underworld.
   
Instead, we got a weird hybrid of the two. If Lorthondo has any backstory, I never encountered it in Moonshade. NPCs and books have built up the executed necromancer, Vasculio. Why isn't there equal attention given to this Lorthondo? (It's possible that there was, and I missed it.) The nature of the dungeon is also left a little vague. There's a suggestion in the "old man" note that Lorthondo created it as a test, but everything that happens is a bit too bizarre to be any kind of test.
        
This is what the demon looks like, by the way.
        
If I had written this dungeon, I would have said something like: "Filbercio has exiled mages to the Mountains of Magic for years. These diverse mages have interacted with the dungeon's Stoneheart in dangerous, unpredictable ways, creating a confusing nightmare of monsters, apparitions, and living memories." I would have presented it as a kind of "wild magic" zone. That's how it feels, but not how it plays in the game's lore.

The Black Sword bit was also unsatisfying. I don't like fake roleplaying choices. If the demon had to be freed no matter what, then the developers should have scripted something more interesting. In a dungeon full of mages and dangerous rocks, there are any number of ways to explain the demon's escape.
     
I wanted to wrap up this entry with a quick "What's New?" tour of the city, but I ran out of time, so I'll have to tackle that next time. Something had better be new, or else I have no idea how to leave Moonshade.

Time so far: 33 hours

Tuesday, March 21, 2023

Antepenult: Won! (with Summary and Rating)

 
Shalt thou give me some kind of reward to bring back to my own world with me?
       
Antepenult
United States
Independently developed; published as shareware
Released 1989 for Amiga
Date Started: 18 February 2023
Date Ended: 18 March 2023
Total Hours: 33
Difficulty: Moderate (3.0/5)
Final Rating: 36
Ranking at Time of Posting: 385/508 (76%)
    
Summary:

Antepenult is a superior Ultima clone that uses themes, mechanics, and graphics from Ultimas I-V to tell an original story. The unnamed character must explore five worlds and piece together clues necessary to stop a demonic invasion. Names and themes are mostly drawn from Greek and Christian mythology as well as real place names and history in the eastern Mediterranean. The game makes the most of iconographic exploration and keyword-prompted dialogue, although RPG mechanics and role-playing elements are somewhat limited. It is nonetheless a commercial-quality game and a bargain at its shareware asking price.
     
*****
   
Antepenult ultimately comprises five continents: Havilah, Tartarus, Atlantis, Aetheria, and Gehenna. When I last blogged, I had mostly finished with the first three and had just found my way, via the Mark of Air, to Aetheria.
   
Aetheria consisted of half a dozen cloud "islands" interconnected by moongates. Finding my way from one island to another was a bit of a puzzle, as each moongate stays active for three phases, and each phase takes you to a different destination. If you just stand in the moongate's square, waiting for it to take you when it arrives, you end up just bouncing back and forth between two destinations.
        
The world of Aetheria, from an observatory.
     
The continent was clearly meant to be the most elevated of the group, not just in literal altitude. There were only a few enemies, all in a maze on one island, and almost all the NPCs were positive and helpful. They were mostly artists and philosophers. Many spoke as if I had already defeated the evil daemon, and they talked about the songs they intended to compose, honoring my victory.
     
I appreciate your confidence.
     
The continent had a castle (Hierosolyma) and four cities: Mycenae, Memphis, Corinth, and Persepolis. Various notes and revelations from my explorations:
    
  • Aetheria is ruled by King Pericles. He didn't have much to offer.
  • One questline started with an NPC asking me if I knew the Latin word for "old man." I looked it up--SENEX--and got it right. It ultimately led me to an old man who deciphered my four runes and told me a password (KHAMPO) that I needed to enter Gehenna. I wonder what 1989 players did.
      
Maybe if I said "no," he'd just tell me.
      
  • An observatory in Mycenae gave me overhead views of each of the continents. The view of Gehenna was mirrored, for some reason, but it otherwise turned out to be vital.
       
I can't say I'm looking forward to this.
     
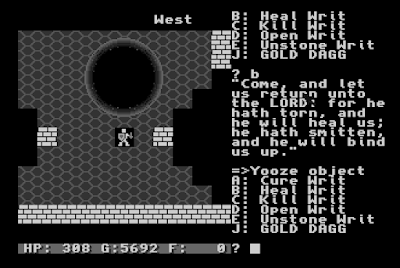
  • I learned of three new writs: Open, Kill, and Unstone. All three questlines took me to Persepolis, described below.
      
The game missed an opportunity by not naming the horse "Sideras."
      
  • Corinth had the game's best weapons (two-handed sword and crossbow) and armor (plate mail) available.
  • A throwaway comment from a druid told me the name of the daemon: "[Your] gravestone will read 'Here lies the Bane of Screwtape, who delivered the land of Havilah from the evil presence!" The name comes from two C. S. Lewis stories. I've heard of them but never read them.
      
The first appearance of the daemon's name.
       
  • In the library of Memphis, I was able to read a book that told me more about Screwtape and prepared me for some of the challenges I'd face in his domain. 
        
Doesn't sound much like a "daemon."
      
  • An NPC named Ahasuerus had leads on all the keys. He told me I wouldn't be able to get the Key of Fire until I was already in Gehenna. I should ask for it in the city of Aedin. More on the Key of Air in a bit. I had Water and Earth already, though only because I searched a couple of places prematurely. Ahasuerus's hints would have led me to them.
  • An NPC named Philemon is storming mad about a letter he just got from Paul. "He shall be hearing from my attorney!" he rages. You don't get a lot of biblical jokes in RPGs.
           
"See, it's funny because Paul has abetted Philemon's runaway slave, Onesimus, who has run away with some of Philemon's money." -- words never before written anywhere.
       
Persepolis was the most challenging of the two cities. It had two different areas, each with its own puzzles. The easier of the two was a "haunted house." It was a maze of teleporter pads, full of non-hostile ghosts. Killing them turned the guards on me, so I just had to avoid them, but they were often in my way. 

The haunted house had two important NPCs. One of them sold me the Writ of Unstone (I'd learned about him from a talking horse named Balam). The second gave me the crucial clue I needed to find Theseus and the Minotaur in Cnossos: say the word AXIOMEN to Ariadne. The latter NPC made me "prove I'm worthy" by giving her the name of her cleric friend in Chryse (CYRIL). Thankfully, I'd written all the names of key NPCs down.
   
The harder part of the city was a "mirror maze." It wasn't large, but it was difficult to navigate until I realized what was going on. I was simultaneously annoyed and impressed at the programming. The maze mimics what would happen if every wall was a mirror. When you're standing next to a mirror, you see a copy of yourself in that direction. If there are mirrors on both sides, you see infinite copies of yourself in both directions. Valid lines of travel are presented as completely open. You have to keep an eye on the center of the screen, as the PC always occupies the exact center. 
        
In the mirror. I'm in the center. There's a mirror to my west; hence, the duplicate image. The paladin is in a nook to the north with a mirror behind him, which is why you can see both of us mirrored. The way to the east is open. So is the south, but I can only move one square in that direction.
        
I ended up mapping it to be sure I'd found everything. It wasn't very big. When I was done, I had a lead on the Mark of Fire and I'd purchased the Writ of Kill after promising never to use it on a human being. 
        
The extent of the maze.
      
I hit dead ends on a couple of questlines. In Corinth, Ahasuerus told me to ask another NPC named Mephibosheth of the Key of Air. Mephibosheth didn't respond to any prompts and I couldn't progress. I later learned from the author, Paul Falstad, that the prompt I was supposed to use was SEGMENT. I think someone did give me that prompt and I forgot about it. In any event, I found the Key of Air by simply searching every square of a maze on one of Aetheria's islands. There was nothing else in the maze, and I figured it must exist for some reason.
   
In the same manner, I solved the puzzle of the silver coin that I needed to pay Charon to cross the River Styx. I never found the NPC (Hippocoön) who was supposed to tell me its location, but there was this ship graveyard in the southeast corner of Atlantis that otherwise seemed to have no purpose. When I was done with Aetheria, I returned and searched every ship until I found it.
       
It seemed like an obvious place.
      
I had learned in Aetheria that the Writ of Open would be found with a stoned beggar (that is, turned to stone) on the top floor of Castle Pergamum. Now that I had a Writ of Unstone, it was time to visit again. There's quite a bit more to the ruined castle than I discovered on the first visit including a hidden treasure chamber in which half of the chests are mimics. Numerous NPCs thank you if you unstone them, although they have no other dialogue, and leaving the floor and returning simply sees them turned to stone again. I unstoned a lot of guards and then regretted it when they attacked me for looting the treasure chamber.
   
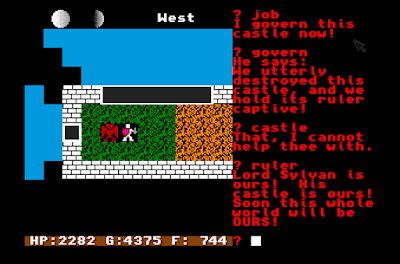
Getting to the stoned beggar on the "top floor" was more work than I anticipated. First, I had to walk through fire (now possible with the Mark of Fire) to find a ladder downward in the kitchen. That led to the dungeon, which I had to fully explore before finding another ladder up in the southeast. This led to a tower that went up about six stories before depositing me on the top. I met a daemon named Ba'asha who boasted that he ruled the castle now--just before I killed him.
        
Good luck with that.
       
The beggar was in a cell south of the daemon, and soon I had the final writ.
      
Apparently, beggars can be choosers.
     
That left the Golden Dagger, which I knew I'd find with Theseus and the Minotaur. I returned to Tartarus and the island of Cnossos and spoke to Ariadne. I fed her the keyword, and she agreed to lead me to Theseus. For about ten minutes, I had to follow her through the labyrinth that I had mapped last time. I don't know how hard it is to program such a thing, but there's nowhere else in the game where you have to follow an NPC, so I was impressed that Falstad took any time to do that for this one quest. I was dying to see where I'd "missed" a secret door. It turns out that it was on the east wall of what I had assumed was the eastern boundary of the maze, and thus hadn't tested any of the wall squares. If you read my last entry, you'll get the irony: I started the post by talking about how some mazes can take unexpected turns, and how you can never smugly assume you've found the outer edges.
    
All that mapping was for nothing. One point for you, Falstad.
      
The Minotaur was roaming an open area while Theseus hid behind a door. Whatever some NPC in Imperium had told me about the castle's daggers being magical was nonsense. None of my weapons, including the daggers, could even touch the Minotaur. He tore me apart in about four rounds. I ultimately killed him with the Writ of Kill (the only time I used it), but I'm not sure it's even necessary to kill him. The Golden Dagger is in a nearby nook, and you could take a route that reaches it without encountering the beast.
   
At last, I had all of the items necessary to descend into Gehenna: the four writs, the four marks, the four runes, the password, the Silver Coin, and the Golden Dagger. I had long since guessed that the route to Gehenna would be through the mountain next to Pergamum, where there was a dungeon called Skotos. Both Skotos and the last dungeon of the game, Bathos, were harder than the others, with numerous dead ends as you go from Level 1 to Level 8, back up to Level 1, and so forth. Still, I never found it necessary to map. I wrote down notes when I hit a place with multiple options; for instance, "Level 5: Arrive in SW corner. Ladder up to N; ladder down to E." I'd just keep track of each note until I hit a dead end, then backtrack.
       
Making my way to hell.
     
Skotos dumped me into a lake of fire, poison, and sleep fields. I searched the center and found a portal. I was asked for, and gave, the password: KHAMPO.
   
I arrived in the southwestern corner of Gehenna. A path east brought me to the shores of the River Styx, which was swarming with ghosts. A ship made a back-and-forth journey, so I waited and boarded, giving the silver coin to the "dark oarsman." I'm not sure if it's possible to return to Havilah after this point. I didn't try.
       
The (non-hostile) ghosts on the river were a nice touch.
         
The rest of Gehenna was a large world full of fire and lava, swarming with demons, devils, balrons, xorns, phantoms, liches, and other nasties. The Mark of Fire let me walk through fire without taking damage, but I still took heavy damage from lava . . . which wasn't a concern because the Writ of Heal restores half your lost points every time you use it and never runs out. Combat was a trivial annoyance for this entire last session, as I could just use the writ whenever I got low. 
      
Making my way through Gehenna.
       
Long, twisty mazes sprouted off the main routes on all sides, most leading nowhere. The map I'd gotten from the observatory in Mycenae showed me the location of the two cities: Aedin and Xenophon.
   
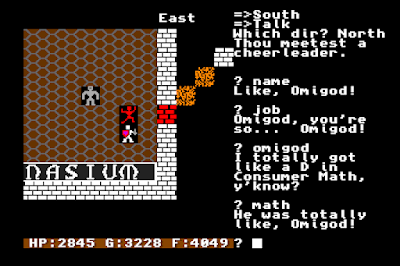
Aedin was a weird town modeled after a high school. The NPCs were hall monitors, cheerleaders, jocks, and teachers. They didn't respond to dialogue prompts but just read lines appropriate to their stereotypes. Falstad was a high-school student when he wrote the game, and "Aedin" is an anagram for his hometown, Edina (Minnesota). I asked him whether equating high school with hell was just teenaged angst or whether he had a uniquely hellish experience, and he said it was the former. "It's actually a great school and I had a good experience there in retrospect."
        
35 years later, this joke still works.

A high-school gym teacher.
             
But what could have been a silly joke actually has an in-game plot twist: the NPCs aren't really people. They're demons acting like people. A jester boiling in a lake of lava told me that if I killed all of them, the way would be open to me. I did so and got access to a hidden corridor at the south end of the city.
   
The game had been mercifully empty of Monty Python references, so I suppose it was time. In the southern corridor, my way was blocked by a "Black Knight." Again, what could have been a dumb joke was rendered slightly more interesting in that Falstad took the time to graphically depict the consequences of my chopping off his limbs one by one as he protested that it was "only a flesh wound."
     
This was written by a teenager in the late 1980s. I suppose this was inevitable.
      
The final NPC told me that I'd find the Key of Fire in the other city, Xenophon. He also told me how to find a secret door that would keep me safe from monsters.
   
Xenophon, at the other end of the map, was presented as a resort town with a hotel and golf course. A large corridor ran through the center of the city and was chock full of enemies, including guards, which were still a slight threat despite the Writ of Heal. The NPCs instructions took me to a place where I could shoot them safely through a window.
   
I had to rent a room at the hotel lobby, in the north end of the city, to get automatically teleported to the guest rooms in the south end. This took me a while to figure out because I kept accidentally killing the desk agent while shooting all of the other monsters in the area. My hotel room led me to the golf course, where I found the Key of Fire in the middle of a rough.
       
Sniping guards through a window.
         
At this point, I was stuck. I knew the entrance to Screwtape's castle was "hidden," but I didn't know where, and I wasn't about to bang into every mountain range and search every square of lava to find it. I did search every square in the large central lake, to no avail. I eventually ran out of food and began to starve, but again, there's no real consequence to that when you have the Writ of Heal.
   
I had to ask Falstad for a hint. It turned out that I had forgotten the demons on the top floor of Castle Chryse. They had each given me a part of a hint as to where I'd find the dungeon Bathos, in the northwest corner of the map. With their instructions, I was able to find it and descend. Although they all promised they'd meet me there and kill me, I never saw the demons themselves.
       
The dungeon entrance doesn't reveal itself until you're in the adjacent square.
    
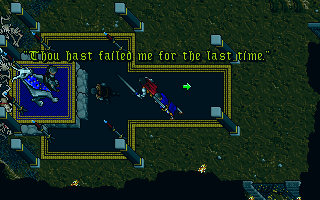
Bathos was 13 floors instead of the usual 9, but it wasn't any harder to navigate than the others, just longer. It spit me out in the prison called Phylaxis, where an NPC had told me that Lord Sylvan was being held "where I would never suspect." The prison was full of what looked like dead bodies. Some of them were alive, but all they would say was, "Help me." I circled the entire prison before discovering that the way to Sylvan was through a secret door two steps south of the entry ladder.
   
The dying Sylvan told me where to find Screwtape's castle before suddenly disappearing. "I shall watch thy progress from above!" were his last words.
       
I'm not sure how to interpret that.
         
I trudged back up the corridors of Bathos to Gehenna and made my way to Screwtape's castle, resisting the urge to just reload from Gehenna now that I knew where the castle was.
   
Entering the castle brought me to the perimeter of a castle-shaped building surrounded by a poisonous moat. There was no obvious way to enter, but the Writ of Open cleared a path. Even then, it looked like there was a wall blocking me to the north, but it turned out that those wall squares were living creatures which attacked when I approached. Shades of the floor tiles in Ultima III!
        
The five wall tiles at the top of the screen are about to attack me.
       
An NPC prepared me for the fact that the castle, Pandaemonium, had another mirror maze, this one much larger than the one in Persepolis. But I had also learned from the book that Screwtape would be at the center of the maze, so I didn't have to map the whole thing. Demons and other monsters attacked as I explored, but they were trivial. After mapping the contours of the castle, I found the exit from the maze in the north-center area.
     
As much as I mapped of the castle. Everything up to the room in the north-center is a "mirror maze."
     
I then ran up against a wall with four keyholes. One by one, I used the Keys of Air, Earth, Fire, and Water. The wall disappeared and opened up a set of corridors that led me to Screwtape.
         
It took me a while to realize those were keyholes.
       
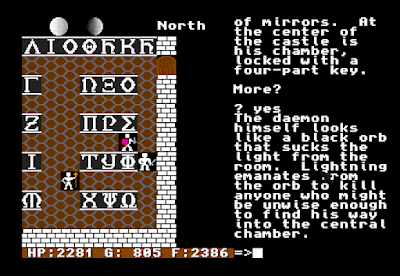
As the book had promised, Screwtape was a large, black orb that shot lightning and sucked the life force of anyone in the area. My hit points dropped dramatically as I approached. But I was able to get up next to him and use the Gold Dagger. (I tried talking to him first, but he had nothing to say.)
        
The Pupil of Sauron.
       
Lines of color shot from the daemon's center, and he disappeared. He must have been a "load-bearing boss," because the castle started crumbling. Patches of fire and darkness appeared on the floor as I raced for the exit. After a few steps, darkness closed around and everything went black.
        
What comes out of a daemon.
      
I awoke in a restored Castle Pergamum. (I suspect if I had gone directly to Screwtape without freeing Sylvan, I would have died in Pandaemonium.) As I walked down the corridors, I passed cells of imprisoned demons, devils, and dragons.
        
I just realized I have 94 food here. Where did I get the food?
     
NPCs from throughout the game came up to congratulate me. "I told thee thou wouldst do it!" "Thank you for saving my castle!"
    
I passed King Minos flanked by a couple of burly guards. Apparently, the Resistance deposed him and ransacked his treasury.
       
Somebody solved a side quest without me!
     
One NPC set up a potential sequel: "Thank you for saving me from that detestable witch-queen Celaeno . . . She has fled Gehenna and is probably plotting some evil against Havilah! Perhaps thou wilt again be required someday to deal with her!" The problem is, I don't think I ever encountered this questline. My notes don't say anything about a Celaeno.
       
This was a bit confusing.
     
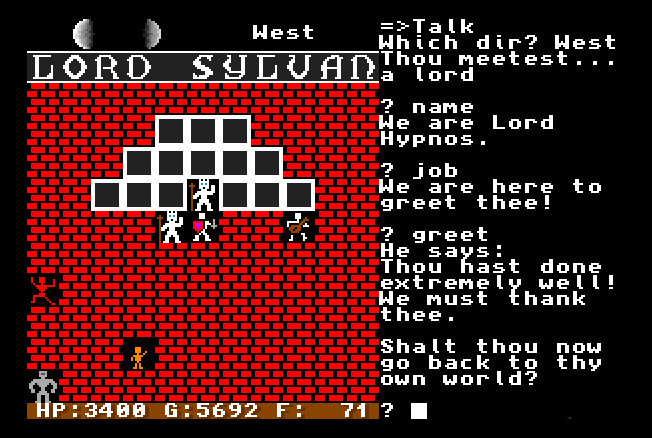
Both King Hypnos and Lord Sylvan were waiting in the throne room. Sylvan explained that after I rescued him, Hypnos had been able to pull him out of Gehenna. I guess he also pulled me out, though he didn't say it explicitly. Both thanked me profusely and said if I was ready to go back to my own world, I could exit through the south. This is the first time the game has mentioned that the PC was from another world in the first place.
   
The door led to a small yard with a moongate. I entered, then watched as a figure approached from the south, turned into a demon, and followed me through. Game over.
       
This is ominous, but on the other hand, it looks like one of those generic demons that I slaughtered in droves.
        
This final session was long, but I had a great time. With set pieces like the mazes of mirrors, the two towns in Gehenna, the trails of NPC clues, and the overall superior level design, Antepenult equaled or transcended its primary source (Ultima III) in many mechanics, if not always in RPG elements. It repeatedly offered that delicious experience of running me up against a wall (sometimes literally) and letting me find the solution just when I was on the brink of despair. (I would have figured out the location of Bathos eventually; I wrote to Falstad prematurely.) The final hours recalled the best moments of RPG playing as a kid, when you understand that you're in the final chapter and you're up until the wee hours, nails bitten ragged, hoping there isn't some unsolvable final riddle, then suddenly realizing--holy #$@&!--you're going to win!
    
This is a long entry already, but I don't have enough material for a separate "summary and rating," so let's just do the GIMLET now:
       
  • 4 points for the game world. I like the use of Greek and biblical themes and the emerging storyline. But there is an extent to which the game world feels like a bunch of clever references rather than a cohesive world of its own, and I would have appreciated a bit more backstory. Back on the positive side, the game deserves credit for its creative depiction of its environments within the limits if iconographic tiles.
       
Discovering Pandaemonium via a secret pass in the mountains.
    
  • 2 points for character creation and development. There's no character creation. Development is fast, but I never felt a lot stronger since enemies increased in difficulty and enemy stacks increased in number as I leveled up.
  • 5 points for NPC interaction. I'm a sucker for keyword-based dialogue, but like the backstory, the NPCs felt more like references than people with personalities and goals. I still enjoyed the process of tracking them down and finding them in hidden locations. I also liked that monsters could sometimes be NPCs, so you had to be careful not to just swing away.
     
Talking with the ruler of Aetheria.
     
  • 4 points for encounters and foes. There's nothing terribly special about the monsters in the game, which are all drawn from Ultima and essentially require the Ultima manual to understand their descriptions. The points in this category all go to the variety of non-combat encounters and puzzles. The labyrinth, the mirror maze, and other such "set pieces" will stick with me for a while.
  • 2 points for magic and combat. Your options boil down to ranged or melee combat. The lack of a real magic system hurt this category significantly.
  • 3 points for equipment. The ordinal scale of weapons and armor is nothing to sing about, but I'll toss in an extra point for the marks and writs.
       
The last weapon shop.
        
  • 4 points for a surprisingly strong economy. With health, food, weapons, armor, and transportation to purchase and continually refresh, only in the last few hours did collecting gold become unnecessary.
  • 3 points for quests. I usually just give 2 points for a game that has a clear main quest, saving the rest for alternate endings, role-playing options, and side quests. I'll add an extra point here because the steps on the main quest are "tiered" well, and there might be an alternate ending if you kill Screwtape without rescuing Sylvan first. The game only offers one save slot, and I didn't make backups.
  • 4 points for graphics, sound, and interface. The graphics are plagiarized, but still good, and the author even improved upon Ultima in some areas with smoothed edges and transitions between areas, and he used the tiles in innovative ways. I always appreciate a one-letter-per-command keyboard interface. Only a lack of compelling sound really hurt this category.
  • 5 points for gameplay. The game gets credit for nonlinearity and medium difficulty. It unfortunately doesn't get any for replayability, and it edges towards being just a bit too long for its content.
    
That gives us a final score of 36, which I confess is a little lower than I was imagining when I started the process. I was hoping it would come closer to the 40 that I gave Deathlord (1987). Antepenult suffers on my scale for not having strong character development and combat, and yet I found it far more "playable" than Deathlord. Nonetheless, looking at the individual categories, I can't argue with the result. A score of 36 still puts it above most other Ultima clones, into "recommended" territory, and certainly above the average shareware game of the period.
        
I told Falstad that I was surprised that he never tried for a commercial release. He said he felt that the quite literal copying of the tilesets disqualified it for commercial publication. I suspect any good publisher would have hooked him up with a graphic artist who could have redesigned the tiles in no time.
     
This was Falstad's only game but not his only program. After attending Princeton University, he made a living as an independent software engineer. His programs include a popular circuit simulator.
    
I can only imagine that Antepenult's relative obscurity lies in the fact that it was offered as shareware on the platform whose users would be least likely to appreciate its approach. I'm proud to have been the first person to give a full account of it online.