|
| An enemy ship blows up. |
Ship-to-ship combat is Buck Rogers's primary innovation with the Gold Box engine, and its turn-based, logistical nature is well within the tactical spirit of the series. I don't love it, but it has some strong elements, and I find it preferable to the all-action approach taken by Starflight and Space Rogue.
It is almost entirely optional. There's one place--on the approach to Mars--where it's necessary if you can't bluff your way out of it. Other than that, the combats occur randomly while traveling through the solar system. I've never had "flee" fail when I didn't feel like fighting. The experience rewards aren't high enough to make it clearly preferable to melee combat as a way to grind for experience, and the financial rewards--salvage credits--can only be spent on ship repairs, fuel, and ammunition, all of which are free at the Salvation base. (The only advantage to the credits is a small amount of time savings, allowing you to refuel and repair wherever you want instead of having to return to the center of the galaxy every time. It isn't even terribly dangerous to run out of fuel, as a NEO cruiser will inevitably come by and give you some.) In this sense, ship combat isn't terribly well-integrated into the game.
Space combat begins with a quick encounter session in which you learn the type of ship you're facing, and you have the option to hail or attack. Hailing presents the ability to intimidate, bluff, or ask for aid. I have never had any of these options work. Once in combat, you're on a screen with the enemy ship's status on your left and your ship's status on your right. More information about the enemy ship can be gained with the "Sensor" command.
 |
| Part of the post-ship-combat victory screen. The crew repairs damage to the party's ship while looting the enemy wreckage for fuel and salvageable material. |
Space combat begins with a quick encounter session in which you learn the type of ship you're facing, and you have the option to hail or attack. Hailing presents the ability to intimidate, bluff, or ask for aid. I have never had any of these options work. Once in combat, you're on a screen with the enemy ship's status on your left and your ship's status on your right. More information about the enemy ship can be gained with the "Sensor" command.
 |
| Assessing the enemy ship with sensors. |
Each character has a number of options each round depending on his or her class and whether he or she is the ship's pilot. Technically, any character can take (C)ommand of the ship during a round, but it only makes sense for someone skilled in piloting (which I've only given to my rocket jock) to be in the captain's seat.
The pilot is the most important person in space combat. Only the pilot can close or withdraw, choose to ram the enemy, or give the command to board a crippled enemy. The pilot is also the only character who can fire all of the ship's weapons in a round--the K-cannons, missile mounts, and lasers. He's capable of 280 points of damage to the enemy every round (100 from each of two K-cannons; 40 from each of two missile blasts) as opposed to every other crewmember's 10 points of damage with a single laser shot.
When firing, the crewmember has the option to just (F)ire and hit a random part of the enemy or (T)arget a specific system. This choice is well-implemented. I don't know what the specific trade-off is mathematically, but based on experience, I suspect that you sacrifice about 50-60% of your chance to hit if you choose to target. If you didn't trade so much accuracy, it would be an easy choice: just target the enemy's hull repeatedly until the ship blows up.
The engineers theoretically play a major role in combat, as only they can (J)ury rig (temporarily repair) damaged systems and (B)oost engines to improve the chances of escaping or catching up to a fleeing enemy. But these options aren't implemented well. First, jury rigging depends on the associated skill of the same name, which takes a long time to build to a level that it actually works a majority of times (having two engineers has helped a little). Second, it hardly repairs the systems at all. Even at a high skill level, I might only get 5 or 10 points out of a jury rig, which a single enemy shot can undo. Third, you can only successfully jury rig each system once in a single combat. So in a typical scenario, the enemy will successfully whittle my "control" system from 150 down to 0. I successfully jury rig and it goes up to 7. The next round, the enemy shoots it back to 0 and I can't jury rig it again.
 |
| An engineer's combat options. |
Fortunately, jury rigging does work repeatedly, and completely, on damaged weapons systems, and this is where I get the most use out of it.
In a similar vein, boosting engines has such a high failure rate--which consequently damages the engines--that it's almost never worth the risk.
The measly 10 points of damage that the non-pilot characters do is still
enough to destroy weapons systems, but it's pretty useless against
other systems. Thus, I've found that a good strategy in ship combat is to have all of my characters except the pilot target the enemy's weapons systems. They miss 60-70% of the time, but if I can knock out even one or two enemy weapons in a single round, it gives me a lot more time for my pilot to blast away at the other systems.

Victory in space combat means destroying the enemy's hull. Destroying other systems theoretically has some effect. When the sensors reach 0, you can no longer see anything about the enemy ship. When control reaches 0, you can't close, withdraw, or ram. If fuel or engines reach 0, you can't go anywhere. I don't know what's supposed to happen when life support hits 0

Victory in space combat means destroying the enemy's hull. Destroying other systems theoretically has some effect. When the sensors reach 0, you can no longer see anything about the enemy ship. When control reaches 0, you can't close, withdraw, or ram. If fuel or engines reach 0, you can't go anywhere. I don't know what's supposed to happen when life support hits 0
I've only attempted to board a ship a couple of times, and I don't really think it's worth the hassle. First, you have to get the enemy's engines down to 0, which involves a lot of targeting and missing. Then, you have to fight a series of long, difficult melee battles as you invade the ship and capture the bridge. In the end, the only result is a higher salvage value, which you don't really need anyway.
 |
| One of six combats I had to fight when taking control of this enemy ship. |
Different enemy ships--classified as light, medium, and heavy--start with different values for their various systems, and in general I've found that enemy ships are either easily defeated or absolutely impossible. I suppose with luck and skill, I could eventually destroy a cruiser with a hull of 2000, but I don't see how it would be worth the time.
To understand melee combat in Buck Rogers, you first have to understand equipment. There are 20 different types of weapons in the game (though more if you account for "Martian" and "Venusian" variants) organized into seven categories:
 |
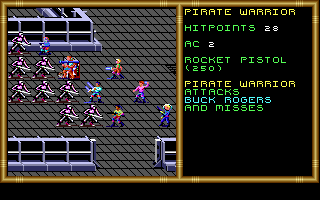
| Fighting RAM forces and "guard dog" combat gennies. |
To understand melee combat in Buck Rogers, you first have to understand equipment. There are 20 different types of weapons in the game (though more if you account for "Martian" and "Venusian" variants) organized into seven categories:
- Melee weapons: knives, mono knives, cutlasses, swords, polearms, mono swords
- Bolt weapons: crossbows, needle guns, bolt guns
- Laser weapons: laser pistols and laser rifles
- "Rocket" weapons: rocket guns and rocket rifles. Despite their names, they basically fire bullets.
- Special weapons: microwave guns, heat guns, sonic stunners
- Explosive weapons: plasma throwers and rocket launchers
- Grenades: aerosol mist grenades, chaff grenades, dazzle grenades, explosive grenades (including "mini" versions), and stun grenades. The ranges on these can be enhanced with grenade launchers. The manual mentions gas grenades, too, but I never found any.
There are "Martian" and "Venusian" versions of the guns, and I frankly have no idea how they differ from the regular versions. The manual is silent on the matter.
The logistics associated with these weapons are slightly more complicated than in D&D, as each has a different range, damage rating, and rate of fire. For instance, the rocket rifle does the most damage of any non-explosive weapon: 2-16 points. But it only fires twice per round, so you get a maximum of 32 points damage if you make both shots. The rocket pistol only does 1-10 per hit, but it fires up to 4 times per round, giving you a maximum of 40 points of damage. It would seem that the pistol is therefore the best option, but each weapon also has different "to hit" penalties at long ranges, and the rifle is considered "close range" at a much longer distance than the pistol. The upshot is that most characters need to have several different weapon types at hand, and to freely switch depending on the circumstances. This is a little different than the D&D titles, where you basically choose the "best" weapon and keep it readied until you replace it with another.
Firearms come with a maximum of 250 rounds, explosive weapons with a maximum of 10. You can buy reloads in shops, though most firearms are so plentiful that it's easier just to replace a spent weapon with another one looted from an enemy body.
It's the grenades and explosive weapons that add the most tactics to combat. Plasma throwers and rocket launchers can only be fired once every two rounds but do a lot of damage to groups of enemies, akin to fireballs in the fantasy games. Grenades actually come in defensive varieties: chaff grenades block rocket weapons into the affected area, and aerosol mist grenades block laser weapons. Stun grenades can take up to 9 enemies out of the fight for a few rounds; it particularly hurts when enemies toss them at your party, but as long as your medic is unaffected, he can "de-stun" the others.
Explosive weapons and explosive grenades are life-savers--one might even say crutches--in difficult combats, so it's particularly annoying that you can't buy them anywhere. (You can pay for reloading of the weapons, but the 10 rounds go quickly.) There are a fixed number that come as rewards for specific combats. This omission makes the game's currency almost entirely useless; other than paying for some reloads of prized weapons, I haven't had a single thing to purchase with all of the thousands of credits I've been amassing.
Three other factors, not present in the D&D games, affect success in combat:
1. "Leadership" skill. If a character has a high enough skill, he can "take command" of NPCs in the party (and in the area) and directly control them in combat. This only has an effect when NPCs are around, of course. Technically, we did see this in Champions of Krynn, though it wasn't dependent on a skill score.
2. "Battle Tactics" skill. If any character makes a successful check at the beginning of the combat round, the entire party gets a +1 combat bonus, equivalent of casting a "bless" spell in the D&D games.
3. "Maneuver in Zero-G" skill. When fighting in space or on an asteroid, each character rolls a check on this skill at the beginning of each combat round. If they fail, they get a -2 combat penalty and can only move three squares in the round.
Each of these things happens automatically, so the only player choice associated with them is how many points to invest in these skills when leveling up.
In combat, aside from the choice of weapons, there aren't many tactics except to use mass-damage attacks in places where enemies group (if you don't mind wasting the rounds) and otherwise concentrate fire on enemies one at a time. The AI in "quick combat" does a pretty good job except in the latter area; it will disperse attacks somewhat randomly, meaning it's not suitable for tough battles where you need to reduce the numbers of enemies as quickly as possible. I've found that protecting the medic is a vital combat goal, since if he's unconscious at the end of the battle, no one can get healed. I've given him the weapons with the highest ranges and generally have him hang out in the rear unless he has to rush forward to stop someone from dying.
The nature of post-combat healing also adds to a bit of frustration and anxiety. You're basically at the mercy of the game's automatic rolls for each character's first aid skill and the medic's various healing abilities. Sometimes unconscious characters don't get revived and quite often not everyone gets healed to the maximum. Since there's no option to heal outside of this one screen (aside from returning to the ship, which on most maps isn't possible until you win), you can find yourself in a situation where you technically won the combat, but your party is in no shape for the next one.
Characters can purchase jetpacks allowing them to quickly fly to parts of the battlefield if they pass their "use jet pack" skills. I haven't found this useful. The battle maps aren't large or complicated enough to make it necessary for one character to be at another side very quickly.
I've often praised the Gold Box combat engine as one of the most satisfying in the genre. Buck Rogers doesn't do a bad job with the engine, but I like it far less here than in the D&D games. The lack of spells, including pre-combat buffing spells, removes much of the fun of the engine. Buck Rogers has backstabbing with the rogue classes, but I've found that it's too hard to maneuver into place, and the backstab multiplier isn't very high, so it makes as much sense just to have the rogue shoot. Because of the ranged nature of combat, there aren't as many places where the party can make effective use of terrain (such as hiding around a corner), and party formation hardly matters at all. There are no sweeps, critical hits, or special abilities like taunting and turning undead. There are no usable items like potions, wands, and scrolls. With all of this, you can see why Buck Rogers makes far less use of the tactical capabilities of the engine than the D&D series, and is consequently a lot less fun.
It also means that when a particularly difficult combat comes along, there aren't many options to pursue after you die and reload. You can't radically readjust your strategy because there aren't enough tactics to readjust. You basically just have to try again and hope for better combat rolls.
So far in the game, my most hated enemy are these RAM combat robots capable of firing explosive rockets every two rounds. The damage the rockets do is extremely variable, so if I run into them, I have to pray that I don't get a bad roll in the first round, or they can wipe out half my party. They're immune to some firearms and have extremely high armor classes. The only strategy to stop them from firing the rockets is to disperse the party--ideally right around the enemy--but this is hardly preferable because they then pummel you with nail guns that do 40-50 points of damage per round. There have been a number of combats where I've had to face two of them, and it's taken multiple reloads to get out anywhere close to intact.
It's in these places that I miss the D&D options the most. I can't cast fire resistance spells. I can't "haste" and "bless" everyone before battle and hope for some lucky critical hits early in the combat round. I can't put everything into a Hail Mary backstab. I can't run out of attack range. I can only reload and hope he does less damage this time. Buck Rogers could have restored some of these tactical options with sci-fi analogues to D&D's spells and magic items--stimulants, ointments, special suits, cloaking devices, EM guns that screw-up robots' targeting systems, and so forth--but they just didn't.
Since the last post, I've conquered the Martian RAM base. Mars was, like Venus, another area map in which I had to navigate to a couple of key locations while avoiding or destroying random encounters. As I arrived, Scot.DOS, my ship's computer AI, hacked a RAM communication indicating that RAM was about to destroy a Martian Desert Runner village just in the off-chance that the Desert Runners knew any of RAM's secrets.
 |
| Elias's inventory shows him capable of fighting a variety of enemies. |
Firearms come with a maximum of 250 rounds, explosive weapons with a maximum of 10. You can buy reloads in shops, though most firearms are so plentiful that it's easier just to replace a spent weapon with another one looted from an enemy body.
 |
| Post-combat looting. |
It's the grenades and explosive weapons that add the most tactics to combat. Plasma throwers and rocket launchers can only be fired once every two rounds but do a lot of damage to groups of enemies, akin to fireballs in the fantasy games. Grenades actually come in defensive varieties: chaff grenades block rocket weapons into the affected area, and aerosol mist grenades block laser weapons. Stun grenades can take up to 9 enemies out of the fight for a few rounds; it particularly hurts when enemies toss them at your party, but as long as your medic is unaffected, he can "de-stun" the others.
 |
| This aerosol mist grenade prevents certain weapons fire. |
Explosive weapons and explosive grenades are life-savers--one might even say crutches--in difficult combats, so it's particularly annoying that you can't buy them anywhere. (You can pay for reloading of the weapons, but the 10 rounds go quickly.) There are a fixed number that come as rewards for specific combats. This omission makes the game's currency almost entirely useless; other than paying for some reloads of prized weapons, I haven't had a single thing to purchase with all of the thousands of credits I've been amassing.
 |
| Targeting an enemy group with a rocket launcher. The combat bot has his own rocket launcher. |
Three other factors, not present in the D&D games, affect success in combat:
1. "Leadership" skill. If a character has a high enough skill, he can "take command" of NPCs in the party (and in the area) and directly control them in combat. This only has an effect when NPCs are around, of course. Technically, we did see this in Champions of Krynn, though it wasn't dependent on a skill score.
 |
| A pre-combat screen shows the effects of my high leadership skill. |
2. "Battle Tactics" skill. If any character makes a successful check at the beginning of the combat round, the entire party gets a +1 combat bonus, equivalent of casting a "bless" spell in the D&D games.
3. "Maneuver in Zero-G" skill. When fighting in space or on an asteroid, each character rolls a check on this skill at the beginning of each combat round. If they fail, they get a -2 combat penalty and can only move three squares in the round.
Each of these things happens automatically, so the only player choice associated with them is how many points to invest in these skills when leveling up.
In combat, aside from the choice of weapons, there aren't many tactics except to use mass-damage attacks in places where enemies group (if you don't mind wasting the rounds) and otherwise concentrate fire on enemies one at a time. The AI in "quick combat" does a pretty good job except in the latter area; it will disperse attacks somewhat randomly, meaning it's not suitable for tough battles where you need to reduce the numbers of enemies as quickly as possible. I've found that protecting the medic is a vital combat goal, since if he's unconscious at the end of the battle, no one can get healed. I've given him the weapons with the highest ranges and generally have him hang out in the rear unless he has to rush forward to stop someone from dying.
The nature of post-combat healing also adds to a bit of frustration and anxiety. You're basically at the mercy of the game's automatic rolls for each character's first aid skill and the medic's various healing abilities. Sometimes unconscious characters don't get revived and quite often not everyone gets healed to the maximum. Since there's no option to heal outside of this one screen (aside from returning to the ship, which on most maps isn't possible until you win), you can find yourself in a situation where you technically won the combat, but your party is in no shape for the next one.
 |
| While very welcome, this post-combat healing session didn't get my characters back to maximum shape. |
Characters can purchase jetpacks allowing them to quickly fly to parts of the battlefield if they pass their "use jet pack" skills. I haven't found this useful. The battle maps aren't large or complicated enough to make it necessary for one character to be at another side very quickly.
I've often praised the Gold Box combat engine as one of the most satisfying in the genre. Buck Rogers doesn't do a bad job with the engine, but I like it far less here than in the D&D games. The lack of spells, including pre-combat buffing spells, removes much of the fun of the engine. Buck Rogers has backstabbing with the rogue classes, but I've found that it's too hard to maneuver into place, and the backstab multiplier isn't very high, so it makes as much sense just to have the rogue shoot. Because of the ranged nature of combat, there aren't as many places where the party can make effective use of terrain (such as hiding around a corner), and party formation hardly matters at all. There are no sweeps, critical hits, or special abilities like taunting and turning undead. There are no usable items like potions, wands, and scrolls. With all of this, you can see why Buck Rogers makes far less use of the tactical capabilities of the engine than the D&D series, and is consequently a lot less fun.
It also means that when a particularly difficult combat comes along, there aren't many options to pursue after you die and reload. You can't radically readjust your strategy because there aren't enough tactics to readjust. You basically just have to try again and hope for better combat rolls.
 |
| This situation is fairly hopeless. |
So far in the game, my most hated enemy are these RAM combat robots capable of firing explosive rockets every two rounds. The damage the rockets do is extremely variable, so if I run into them, I have to pray that I don't get a bad roll in the first round, or they can wipe out half my party. They're immune to some firearms and have extremely high armor classes. The only strategy to stop them from firing the rockets is to disperse the party--ideally right around the enemy--but this is hardly preferable because they then pummel you with nail guns that do 40-50 points of damage per round. There have been a number of combats where I've had to face two of them, and it's taken multiple reloads to get out anywhere close to intact.
It's in these places that I miss the D&D options the most. I can't cast fire resistance spells. I can't "haste" and "bless" everyone before battle and hope for some lucky critical hits early in the combat round. I can't put everything into a Hail Mary backstab. I can't run out of attack range. I can only reload and hope he does less damage this time. Buck Rogers could have restored some of these tactical options with sci-fi analogues to D&D's spells and magic items--stimulants, ointments, special suits, cloaking devices, EM guns that screw-up robots' targeting systems, and so forth--but they just didn't.
 |
| The Martian High Desert. All of those blast points are from RAM's tests of its Doomsday weapon. |
Since the last post, I've conquered the Martian RAM base. Mars was, like Venus, another area map in which I had to navigate to a couple of key locations while avoiding or destroying random encounters. As I arrived, Scot.DOS, my ship's computer AI, hacked a RAM communication indicating that RAM was about to destroy a Martian Desert Runner village just in the off-chance that the Desert Runners knew any of RAM's secrets.

At the urging of the computer, I got to the village before the attack and made contact with the tribalistic Desert Runners. They scoffed at my warnings, and I had to convince them that the attack was going to come via GLIDERS (by actually typing in that word) to get them to take it seriously.
 |
| I guess this is to test whether you've been paying attention to what Scot.DOS had to say. |
The Desert Runners decided to hold off the RAM forces while they evacuated their young. The entire map consisted of my running around randomly, fighting battles with villagers, rescuing children from building fires, and performing other acts of heroism. The map was quite large, but as far as I could tell had no fixed encounters. I did all of this until a pre-determined howl from the villagers signaled that the children were safe, and I left the village. RAM destroyed it behind us.

In the Desert Runners' secret camp, there was a gratifying moment as the various villagers recounted my party's acts of heroism.

The Desert Runners' leader, Tuskon, remained suspicious of me. When I admitted to him frankly that I didn't come to Mars to save them but rather to fight RAM on behalf of Earth, he seemed to respect my honesty while admitting, in turn, that they cared nothing about Earth. They told me that RAM has been recently test-firing a giant laser that's been melting bits of the planet's surface, and they directed me to the secret base. Tuskon joined me, gave me RAM disguises, and led me into the secret base.
 |
| Thankfully, the answer was "no" to this. RAM was going to attack the Desert Runner village anyway. I think perhaps my series of truthful answers is what led Tuskon to join. |
The base consisted of four relatively small levels with only a few special encounters. The key dynamic was the acquisition of a series of passkeys that allowed me access to certain doors. I had looted red and green keys from enemies in the Desert Runners' village, which got me into certain areas. Eventually, I found a white key that opened a vault, in which was the high-level blue key.
My exploration was punctuated with random combats against RAM forces and a series of computer terminals where I used my "bypass security" skill to shut down the alarm every time the base became aware of my presence (I did this by filing false reports of my team's demise). I also used my "library search" skill to get intelligence about RAM. There were more journal entries in this section than in the rest of the game combined, though most of them were just security alerts relevant to the current base. There was some indication that the blue passkey would get me through the security doors on the Mercury base.
 |
| Elias uses a computer to shut down the base's alarms. |
Ultimately, with the blue key, I made my way up an elevator shaft to the top level and found RAM's prototype Doomsday laser. In a scripted encounter, Tuskon shot a technician working on the laser. His body fell on a control panel that caused the laser to overload and get ready to fire.
 |
| Apparently, the RAM base and the USS Enterprise use the same contractors. |
My party rode the laser's platform down the elevator shaft and had to fight a close-quarters battle against two very difficult combat robots. This was exactly the type of combat I described above, where there were really no tactics that could make a difference and I just had to keep reloading until everyone survived.
 |
| This combat sucked. |
After the battle, I fled the base as the laser self-destructed behind me, blowing everything to hell and back. My primary take-away from the experience seems to be the blue keycard, which should get me into the Mariposa 3 base on Mercury. I assume I'll find the endgame here.
Shortly after returning to Salvation base, we received a message from RAM indicating that they'd captured Atha, Tuskon's wife, on an asteroid. They were threatening to execute her unless I presented myself. Commander Turabian prohibited it, but Buck Rogers grabbed me in the hall and encouraged me to rescue her, saying that "individuals are more important than orders." I'm assuming that this is a side-quest, but none of my characters have reached Level 8 yet, so I think I'll take it before heading to Mercury.
 |
| That's a nice sentiment, but we are in the midst of a countdown to doomsday. |
I haven't read any walkthroughs yet, but it strikes me that there were probably a lot of ways to have handled the Mars map. I could have ignored the Desert Runners' village entirely and just headed for the RAM base. I could have refused to help the Desert Runners, or fled before the battle was complete. I could have declined to meet Tuskon before entering the base. If Tuskon hadn't been with me, or had died, the scripted bit with the Doomsday laser would have been different. I think there was even a different way to approach the floor with the laser on it. I'm curious how these choices would have affected the experience, and I like that the game offers so many different avenues. We saw something similar on the Venus map, though I neglected to comment at the time.
I expect the next posting to be my last. Funny how that worked out.
Futher Reading
- My first, second, third, and fourth postings on this game.
- My review of the Gold Box combat system in Pool of Radiance. This post in my Curse of the Azure Bonds series talks a little more about the tactical nature of the engine.